Chapter 1: Linux Internals
Interview Questions
This chapter answers to the following questions:
What is the Linux Kernel?
The Linux kernel is the core of the Linux operating system. It is the first program loaded after the bootloader and it runs for the entire lifetime of the system. Every other program — your shell, web server, database, container runtime — runs on top of it.
The kernel sits between hardware and user-space software. It owns the hardware and lends it out. When an application wants to read a file, open a network socket, or allocate memory, it asks the kernel via a system call. The kernel validates the request, performs the privileged operation, and returns the result. The application never touches hardware directly.

Kernel Space vs User Space
This is the most fundamental boundary in Linux.
Kernel space runs with full CPU privileges (Ring 0 on x86). Code here can execute any instruction, access any memory address, and directly control hardware. A bug here can freeze or corrupt the entire system.
✍️ RING 0 — KERNEL MODE
Ring 0 is the highest, most privileged execution level on x86 processors, commonly referred to as kernel mode. Code executing in this ring has absolute, unrestricted access to the CPU, memory, and all hardware components. The x86 architecture defines four privilege rings (0–3), but Linux only uses Ring 0 (kernel) and Ring 3 (user space) — the two extremes of the privilege spectrum.
Image source: Wikipedia
User space runs with restricted CPU privileges (Ring 3 on x86). Code here cannot directly access hardware, cannot read another process’s memory, and cannot execute privileged instructions. An attempt to do so raises a CPU fault that the kernel intercepts and turns into a signal (usually SIGSEGV).
✍️ SIGSEGV — SEGMENTATION FAULT
SIGSEGV(Segmentation Violation / Segmentation Fault) is a fatal error signaled by the operating system when a program attempts to access or modify memory it is not authorized to use. It causes an immediate crash or an exit code 139 in containerized environments like Docker.
| Property | Kernel Space | User Space |
|---|---|---|
| CPU privilege level | Ring 0 — full access | Ring 3 — restricted |
| Memory access | All physical memory | Own virtual address space only |
| Hardware access | Direct | Through kernel via system calls |
| Crash impact | System panic — everything stops | Process terminated — others unaffected |
| How to enter | Interrupt, exception, system call | Normal execution |
The transition from user space to kernel space happens whenever a process issues a system call. The CPU switches privilege level, the kernel runs the requested operation, and control returns to the process at the next instruction.
Major Kernel Subsystems
The kernel is not a monolithic blob of code — it is organised into cooperating subsystems, each responsible for one area of the system.
Process Scheduler
The scheduler decides which thread runs on which CPU core at any given moment. Linux uses the Completely Fair Scheduler (CFS) for normal processes, plus separate schedulers for real-time tasks.
Key responsibilities:
- Allocate CPU time fairly across all runnable threads
- Handle preemption — interrupt a running thread when its time slice expires
- Manage CPU affinity, priorities (
nice,RT priority), and cgroups-based CPU quotas
# Inspect scheduler info for a process
cat /proc/1234/sched

# Set CPU affinity (pin process to core 0 and 1)
taskset -cp 0,1 1234

# Check and set scheduling policy
chrt -p 1234
Memory Manager
Manages all physical RAM and provides each process with the illusion of a large, private address space through virtual memory.
Key responsibilities:
- Virtual address spaces — each process has its own page table mapping virtual –> physical addresses
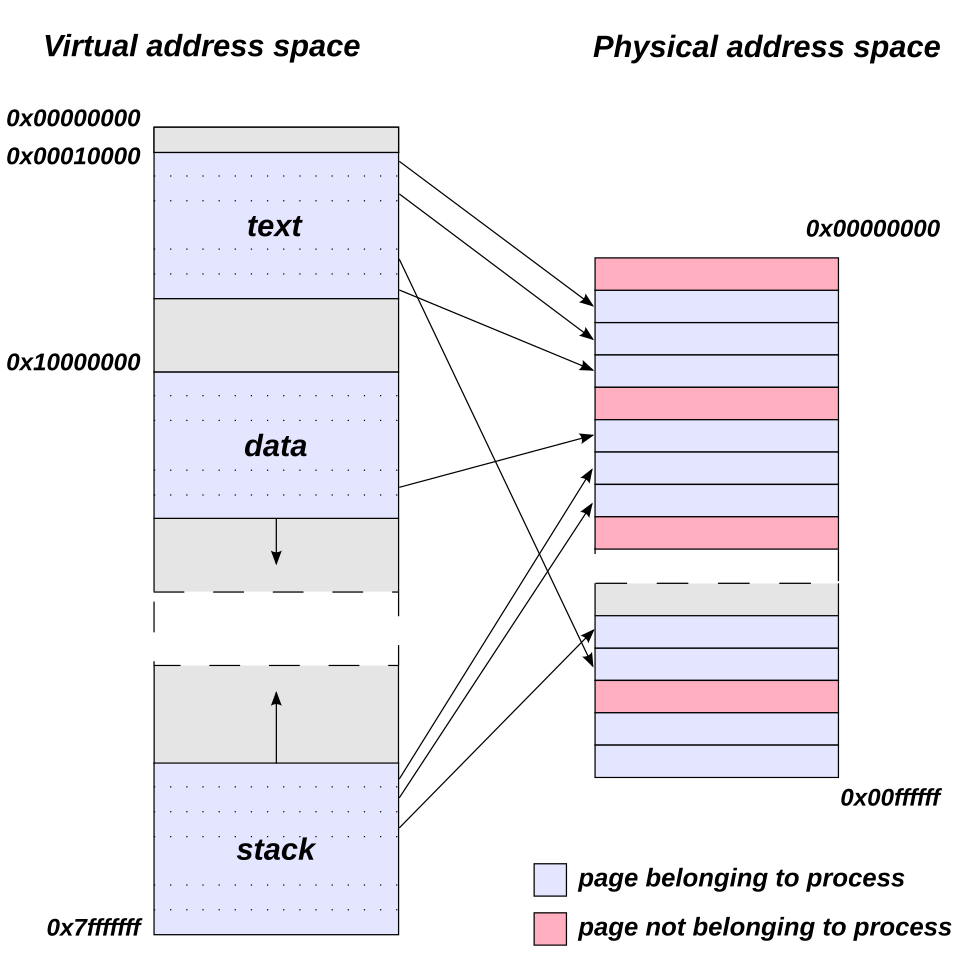
- Demand paging — pages are only loaded into RAM when first accessed
- Copy-on-write (CoW) —
fork()shares pages between parent and child until one writes; only then is a copy made - Swap — evict cold pages to disk when RAM is full
- OOM killer — when memory is exhausted, select and kill a process to reclaim RAM
cat /proc/meminfo           # system-wide memory breakdown
cat /proc/1234/smaps        # per-mapping breakdown for a process
vmstat 1                    # live memory, swap, and I/O stats
Virtual File System (VFS)
VFS is an abstraction layer that presents a unified file API regardless of the underlying filesystem type. When you call open() on a file, VFS routes the call to the correct filesystem driver — ext4, XFS, tmpfs, NFS, procfs, and so on — without the application knowing or caring which one it is.
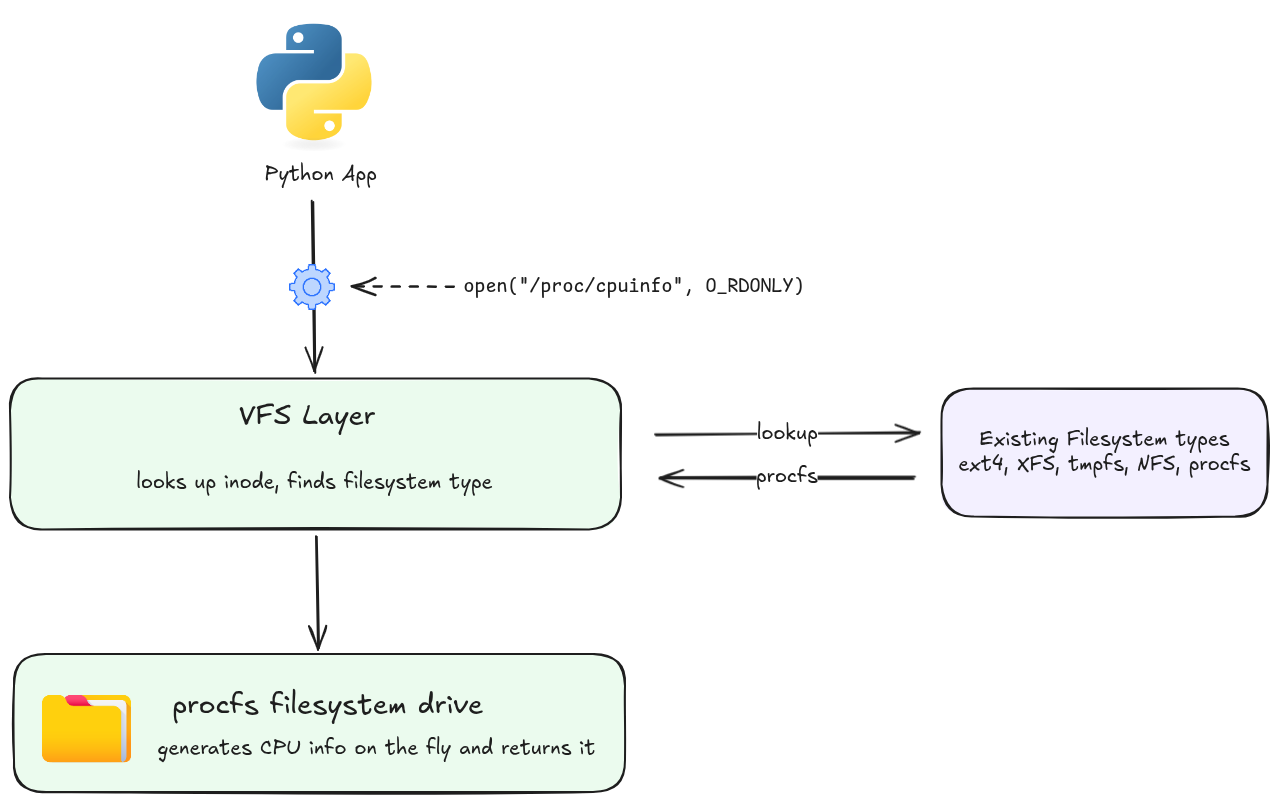
This is also why everything in Linux can be treated as a file: /proc, /sys, sockets, pipes, and device nodes all implement the same open/read/write/close interface through VFS.
Network Stack
Implements the full TCP/IP networking stack inside the kernel. Handles:
- Socket creation and management (
AF_INET,AF_UNIX,AF_NETLINK, …)
✍️ SOCKET
In Linux, a socket is a software abstraction that serves as a bi-directional communication endpoint for exchanging data between two processes. Following the standard Unix philosophy where “everything is a file,” the Linux kernel exposes a socket to applications as a file descriptor (an integer number), allowing programs to read from and write to it using standard system calls.
For more information, see Medium Blog: Socket Programming — Linux.
- Protocol processing: IP, TCP, UDP, ICMP, and higher layers
- Packet filtering and routing (netfilter → iptables/nftables)
- Network namespaces (the foundation of container networking)
ss -tulnp              # socket summary
cat /proc/net/tcp      # raw TCP connection table
ip route show          # kernel routing table
Device Drivers
Drivers translate the generic kernel interfaces (block I/O, character I/O, network frames) into hardware-specific commands. Linux supports two forms:
- Built-in drivers — compiled directly into the kernel image (
vmlinuz)
✍️ VMLINUZ
vmlinuzis the executable, compressed file containing the core Linux kernel. It is booted by the system’s bootloader (like GRUB) to start the operating system. You will typically find it in the/bootdirectory as something likevmlinuz-5.15.137-generic.ls /boot/vmlinuz* # /boot/vmlinuz-5.15.137-generic
- Loadable kernel modules (LKMs) —
.kofiles loaded at runtime withmodprobe
✍️ LOADABLE KERNEL MODULES (LKMs)
Loadable kernel modules are compiled chunks of code that extend the core operating system kernel’s functionality on-demand, without requiring a system reboot. They typically serve as device drivers, filesystem managers, or networking protocols and allow systems to remain lightweight, memory-efficient, and easily customizable.
lsmod                          # list loaded modules
modprobe e1000e                # load a driver module
modinfo e1000e                 # inspect a module
dmesg | grep -i usb            # see driver messages for USB devices
How a System Call Works
When your program calls read(fd, buf, n):
✍️
read(fd, buf, n)— ARGUMENTS
Argument Type Description fdintFile descriptor — an integer handle returned by open(),socket(), orpipe(). It tells the kernel which open resource to read from (0= stdin,1= stdout,2= stderr).bufvoid *Buffer — a pointer to a region of memory in user space where the kernel should copy the data it reads. The caller is responsible for allocating this memory before the call. nsize_tCount — the maximum number of bytes to read. The kernel will read at most nbytes; it may return fewer if fewer are available (e.g. end of file, or a short read from a pipe or socket).The return value is the number of bytes actually read,
0on end-of-file, or-1on error (witherrnoset).
  1. C library (glibc) sets up syscall arguments in CPU registers
  2. Executes the SYSCALL instruction (x86-64) — CPU switches to Ring 0
  3. Kernel's syscall dispatcher looks up the syscall number in the syscall table
  4. Calls sys_read(): validates fd, copies data from kernel buffer to user buffer
  5. Returns to user space via SYSRET — CPU switches back to Ring 3
  6. glibc returns the result to your program
# Trace all system calls made by a process
strace ls /tmp

# Count system calls
strace -c ls /tmp

# Attach to a running process
strace -p 1234
✍️ THE SYSCALL TABLE (x86-64)
The syscall table is a kernel-internal array that maps every syscall number — an integer the CPU receives in a register — to its corresponding kernel function. On x86-64, syscall number
0maps tosys_read,1tosys_write,2tosys_open, and so on up to ~300–400 entries in a typical kernel build. When the CPU executes theSYSCALLinstruction, the kernel’s dispatcher reads that number from theraxregister and jumps to the matching function in this table.You can inspect the table on any Linux system:
# Human-readable syscall names and numbers (Debian/Ubuntu path)
grep "^#define __NR_" /usr/include/x86_64-linux-gnu/asm/unistd_64.h | head -20

# Verify a specific number (e.g. read = 0)
ausyscall x86_64 read
The Kernel and Containers
Containers (Docker, Kubernetes pods) are not separate kernels — they are processes running on the same kernel, isolated using two kernel features:
| Feature | What it does | Example |
|---|---|---|
| Namespaces | Partition global resources so each container sees its own view | PID namespace: container’s init has PID 1 |
| Cgroups | Limit and account for resource usage per group of processes | CPU: max 0.5 cores; Memory: max 512 MiB |
# List namespaces for a process
ls -la /proc/1234/ns/

# Show cgroup limits for a process
cat /proc/1234/cgroup
systemd-cgls
Because all containers share one kernel, a kernel vulnerability affects every container on the host simultaneously — which is the core security difference between containers and virtual machines (VMs run a separate kernel per guest).
Kernel Versioning
uname -r # e.g. 5.15.137-generic
The version format is major.minor.patch-distro:
- Major (
6) — rarely incremented; not meaningful for compatibility - Minor (
8) — incremented with each mainline release (~every 9 weeks) - Patch (
0) — stable backport fixes; incremented frequently - Distro suffix (
35-generic) — downstream patches and build number from the distribution
✍️ STABLE BACKPORT FIX
A stable backport fix is the practice of taking security patches, bug fixes, or feature updates from a newer version of software and porting them to an older version that is still in active use. It allows older software to remain functional, secure, and compatible without requiring an upgrade to a whole new version.
Long-Term Support (LTS) kernels receive backported fixes for 2–6 years. Distributions (Ubuntu, RHEL, Debian) typically ship a patched LTS kernel rather than the latest mainline release.
💡 Interview tip: A common interview question is “what happens when you run a command in a shell?” The answer flows through the kernel: the shell calls
fork()to create a child process, thenexecve()to replace that child with the command’s binary. The kernel loads the binary, sets up its address space, and starts executing it. Every I/O the command does — reading input, writing output — passes through the kernel via system calls. The kernel is the intermediary for every single thing the program does.
Why Would You Need to Compile the Linux Kernel and How to Do It?
Most Linux users never compile the kernel — distributions ship a pre-built kernel that covers the vast majority of hardware and use cases. But there are situations where the built-in kernel is not enough.
Why You Would Need To
| Reason | Explanation |
|---|---|
| Enable hardware support | A new device or peripheral requires a driver that is not included in the distribution’s kernel build |
| Apply a custom or out-of-tree patch | Security researchers, embedded developers, or kernel contributors work with patches that haven’t been merged upstream yet |
| Optimize for a specific workload | Remove unnecessary subsystems (e.g. Bluetooth, Wi-Fi on a dedicated server) to reduce memory footprint and attack surface |
| Enable experimental features | A feature exists in a newer mainline kernel than the distribution ships (e.g. a new filesystem, scheduler improvement, or eBPF feature) |
| Embedded and cross-compilation | Building a minimal kernel for a resource-constrained device (router, IoT, custom ARM board) where the vendor kernel is outdated |
| Learning and development | Contributing patches to the kernel, debugging kernel code, or studying kernel internals |
Prerequisites
# Update repositories
sudo apt update

# Install required build tools (Debian/Ubuntu)
sudo apt install -y \
    build-essential \
    libncurses-dev \
    libc6-dev-i386 \
    libssl-dev \
    libelf-dev \
    flex \
    bison \
    bc \
    dwarves \
    git

# Verify compiler
gcc --version
make --version
Step 1: Get the Kernel Source
# Download a specific release from kernel.org
wget https://cdn.kernel.org/pub/linux/kernel/v5.x/linux-5.15.137.tar.xz
tar -xf linux-5.15.137.tar.xz
cd linux-5.15.137/

# Or clone the repository
git clone --depth 1 --branch v5.15.137 https://git.kernel.org/pub/scm/linux/kernel/git/stable/linux.git
cd linux
Step 2: Configure the Kernel
The configuration file (.config) controls which features, drivers, and subsystems are compiled in, compiled as modules, or excluded entirely. There are three common starting points:
# Option A — start from your running kernel's config (recommended)
cp /boot/config-$(uname -r) .config
make olddefconfig       # auto-answer new options with defaults

# Option B — interactive menu (ncurses UI)
make menuconfig

# Option C — minimal config for the current hardware only
make localmodconfig     # probes loaded modules and disables everything else
✍️
.configFILEThe
.configfile is a plain-text list ofCONFIG_*variables, each set toy(built-in),m(module), orn(excluded). It is the single source of truth for a kernel build. Everymake menuconfigormake olddefconfigreads and writes this file. You can also edit it directly with a text editor for scripted or automated builds.
Step 3: Build the Kernel
⚠️ IMPORTANT: Disable Module Signing Before Building
As we are building a custom upstream kernel, before starting the compilation process we need to disable module signing certificate enforcement in the
.configfile. By default the copied Ubuntu configuration specifies a strict security policy requiring specific cryptographic certificates (debian/canonical-certs.pem) to sign kernel modules during compilation. As we don’t possess Canonical’s private build certificates, we must skip this step or the build will fail.# Clear the system certificates configuration scripts/config --disable SYSTEM_TRUSTED_KEYS # Clear the revocation certificates configuration scripts/config --disable SYSTEM_REVOCATION_KEYS # Refresh the config state make olddefconfig
This time, the compiler will skip looking for debian/canonical-certs.pem certificates.
# Compile using all available CPU cores
make -j$(nproc)
The -j$(nproc) option tells make to use as many parallel jobs (threads) as you have available processor cores on your system, which can significantly speed up the compilation.
This produces three key output files:
| File | Location | Description |
|---|---|---|
vmlinuz | arch/x86/boot/bzImage | The compressed, bootable kernel image |
System.map | root of source tree | Symbol-to-address map used for debugging |
*.ko | scattered under arch/ and drivers/ | Loadable kernel module files |
Build time ranges from ~5 minutes on a modern workstation to 30+ minutes on older hardware.
Step 4: Install Modules and Kernel
# Install all compiled .ko modules to /lib/modules/<version>/
sudo make modules_install

# Install the kernel image, System.map, and config to /boot/
sudo make install
make install calls /sbin/installkernel which copies the files into /boot/ and typically triggers the bootloader update automatically on distributions that support it.
Step 5: Update the Bootloader and Reboot
# Update GRUB to detect the new kernel entry
sudo update-grub          # Debian/Ubuntu
sudo grub2-mkconfig -o /boot/grub2/grub.cfg   # RHEL/Fedora

# Reboot and select the new kernel from the GRUB menu
sudo reboot

# After reboot — verify the new kernel is running
uname -r
Reverting if Something Goes Wrong
The old kernel remains installed and selectable from the GRUB menu. If the new kernel fails to boot or causes issues:
- Reboot and hold
Shift(BIOS) orEsc(UEFI) to enter the GRUB menu - Select Advanced options and choose the previous working kernel
- Once booted, remove the broken kernel:
sudo apt remove linux-image-5.15.137        # remove broken kernel package
# or manually:
sudo rm /boot/vmlinuz-5.15.137 /boot/initrd.img-5.15.137 /boot/config-5.15.137
sudo update-grub
Full Build Flow
💡 Interview tip: If asked “how do you add support for a new hardware device without rebooting?”, the answer is a loadable kernel module — compile only the driver as a
.koand load it withmodprobe. Compiling the entire kernel is only necessary when the change affects built-in subsystems or the driver cannot be built as a module.
Learn More
💪 PRACTICE