The Linux Interview Cookbook: A Practical Guide to Master Your Linux Skills

whoami
Salem! (kazakh version of “Hi”) I’m Maxat Akbanov — a DevOps Engineer based in the beautiful city of Almaty, Kazakhstan 🇰🇿. I’ve been working in tech for a while now, and somewhere along the way I became deeply passionate about cloud infrastructure, automation, and making systems that just… work reliably at scale.
My journey into IT field actually started back in my school days at the Zhautikov Republican Physics and Mathematics School (Fizmat), a place famous for shaping tech minds. While most kids were just playing video games, I found myself completely fascinated by how computer networks functioned and how software was built. I spent my spare time devouring books on Cisco networking and teaching myself the fundamentals of programming using Pascal and C. That early curiosity at Fizmat completely set the trajectory for my entire career.
Eventually, that passion for systems evolved into a deep focus on security. I studied Information and Systems Security for my Bachelor’s at the National Technical University of Ukraine in Kyiv, then went on to do my Master’s in Cyber Security at the University of York. During that time I got to dig deep into real-world threats — I even published a few research papers on the WannaCry ransomware. It was intense, but it gave me a perspective on infrastructure that I carry to this day: security isn’t an afterthought, it’s the foundation.
After university, I worked across all kinds of environments — from large Kazakhstani enterprises like Kazakhtelecom, to early-stage startups like ioka.kz, to globally recognized software companies like EPAM and DataArt. Each one taught me something different about how teams build and ship software. I also spent time as an independent consultant, helping clients design and support their cloud workloads on AWS — things like containerized services on EKS and ECS. Working alone, in small teams, in big distributed ones — it’s all shaped how I think about DevOps.
These days I channel everything I’ve learned about Linux into this book. I write articles on LinkedIn too, and I try to stay connected with the local tech community — attending conferences and giving talks at the AWS Cloud Club here in Almaty.
Outside of work, you’ll find me playing football or basketball, swimming, hiking in the mountains around Almaty, playing chess, or getting way too invested in an online strategy games. Life’s good.
I speak “Tech,” but I also speak human. My native tongue is Kazakh, and I’m fluent in Russian and English, with Spanish and Turkish currently “loading” in my spare time. Feel free to message me in any language — I promise to try and understand you. If my reply comes back as a mix of five different dialects and a bit of Bash script, just know I’m trying my best!
See you! / Көріскенше! / До встречи! / ¡Hasta luego! / Görüşürüz!
Maxat 😉
P.S. Technology moves fast. If you find an outdated command, concept, diagram or a better way to structure a manifest, section, or chapter, please reach out via my GitHub, Linkedin or email. Your feedback helps make this book better!
- maxat-akbanov.com
maxat.akbanov@protonmail.com- My GitHub
Support & Sponsorship
As an independent author, I rely on the support of the community to keep these resources updated and accessible.
If you find this book valuable, I welcome opportunities for support and collaboration to help expand and improve future editions.
I’m open for any of these opportunities:
- Sponsorship and funding
- Technical writing collaborations
- Content review and expert contributions
- Educational or industry partnerships
If you are interested in working together, please reach out with a brief proposal or introduction at:
maxat.akbanov@protonmail.com
Support for this project helps cover research and hosting costs. You can provide support through .

Thank you for supporting accessible technical knowledge.
Preface

Chapter 1: Linux Internals
Interview Questions
This chapter answers to the following questions:
What is the Linux Kernel?
The Linux kernel is the core of the Linux operating system. It is the first program loaded after the bootloader and it runs for the entire lifetime of the system. Every other program — your shell, web server, database, container runtime — runs on top of it.
The kernel sits between hardware and user-space software. It owns the hardware and lends it out. When an application wants to read a file, open a network socket, or allocate memory, it asks the kernel via a system call. The kernel validates the request, performs the privileged operation, and returns the result. The application never touches hardware directly.

Kernel Space vs User Space
This is the most fundamental boundary in Linux.
Kernel space runs with full CPU privileges (Ring 0 on x86). Code here can execute any instruction, access any memory address, and directly control hardware. A bug here can freeze or corrupt the entire system.
✍️ RING 0 — KERNEL MODE
Ring 0 is the highest, most privileged execution level on x86 processors, commonly referred to as kernel mode. Code executing in this ring has absolute, unrestricted access to the CPU, memory, and all hardware components. The x86 architecture defines four privilege rings (0–3), but Linux only uses Ring 0 (kernel) and Ring 3 (user space) — the two extremes of the privilege spectrum.
Image source: Wikipedia
User space runs with restricted CPU privileges (Ring 3 on x86). Code here cannot directly access hardware, cannot read another process’s memory, and cannot execute privileged instructions. An attempt to do so raises a CPU fault that the kernel intercepts and turns into a signal (usually SIGSEGV).
✍️ SIGSEGV — SEGMENTATION FAULT
SIGSEGV(Segmentation Violation / Segmentation Fault) is a fatal error signaled by the operating system when a program attempts to access or modify memory it is not authorized to use. It causes an immediate crash or an exit code 139 in containerized environments like Docker.
| Property | Kernel Space | User Space |
|---|---|---|
| CPU privilege level | Ring 0 — full access | Ring 3 — restricted |
| Memory access | All physical memory | Own virtual address space only |
| Hardware access | Direct | Through kernel via system calls |
| Crash impact | System panic — everything stops | Process terminated — others unaffected |
| How to enter | Interrupt, exception, system call | Normal execution |
The transition from user space to kernel space happens whenever a process issues a system call. The CPU switches privilege level, the kernel runs the requested operation, and control returns to the process at the next instruction.
Major Kernel Subsystems
The kernel is not a monolithic blob of code — it is organised into cooperating subsystems, each responsible for one area of the system.
Process Scheduler
The scheduler decides which thread runs on which CPU core at any given moment. Linux uses the Completely Fair Scheduler (CFS) for normal processes, plus separate schedulers for real-time tasks.
Key responsibilities:
- Allocate CPU time fairly across all runnable threads
- Handle preemption — interrupt a running thread when its time slice expires
- Manage CPU affinity, priorities (
nice,RT priority), and cgroups-based CPU quotas
# Inspect scheduler info for a process
cat /proc/1234/sched

# Set CPU affinity (pin process to core 0 and 1)
taskset -cp 0,1 1234

# Check and set scheduling policy
chrt -p 1234
Memory Manager
Manages all physical RAM and provides each process with the illusion of a large, private address space through virtual memory.
Key responsibilities:
- Virtual address spaces — each process has its own page table mapping virtual –> physical addresses
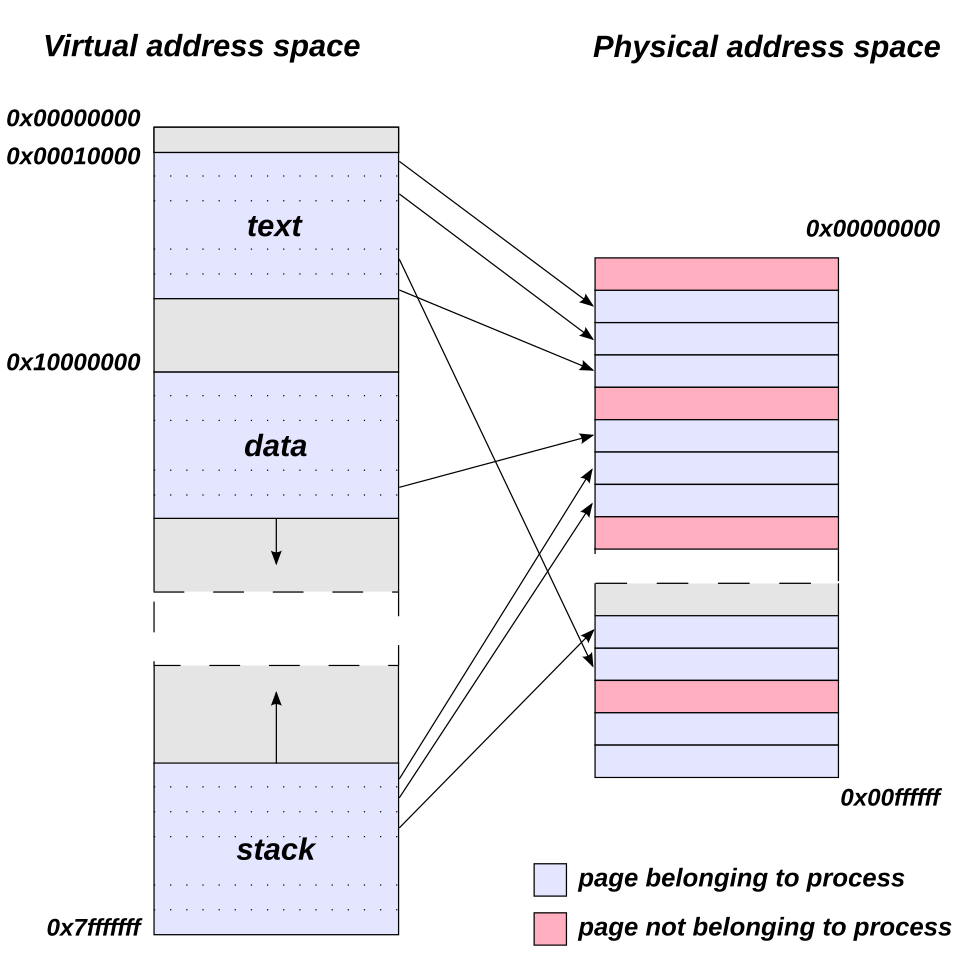
- Demand paging — pages are only loaded into RAM when first accessed
- Copy-on-write (CoW) —
fork()shares pages between parent and child until one writes; only then is a copy made - Swap — evict cold pages to disk when RAM is full
- OOM killer — when memory is exhausted, select and kill a process to reclaim RAM
cat /proc/meminfo           # system-wide memory breakdown
cat /proc/1234/smaps        # per-mapping breakdown for a process
vmstat 1                    # live memory, swap, and I/O stats
Virtual File System (VFS)
VFS is an abstraction layer that presents a unified file API regardless of the underlying filesystem type. When you call open() on a file, VFS routes the call to the correct filesystem driver — ext4, XFS, tmpfs, NFS, procfs, and so on — without the application knowing or caring which one it is.
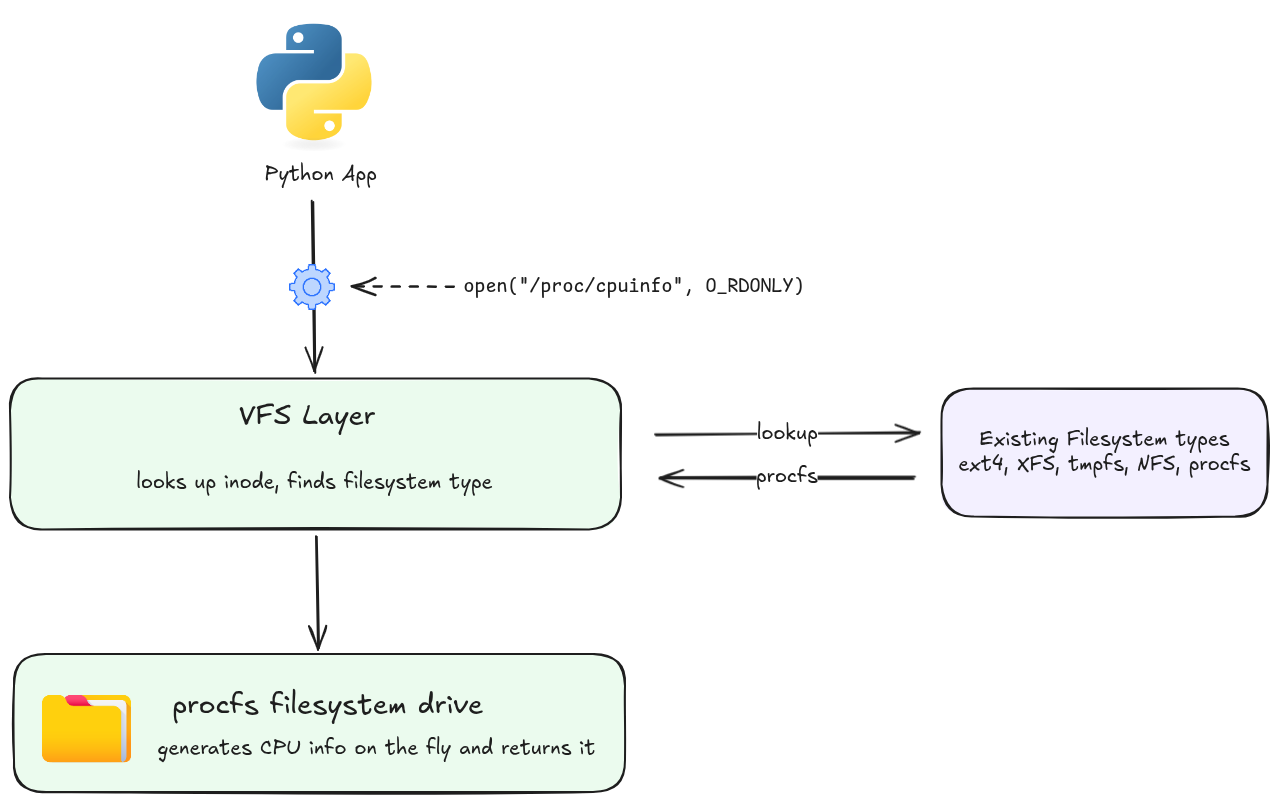
This is also why everything in Linux can be treated as a file: /proc, /sys, sockets, pipes, and device nodes all implement the same open/read/write/close interface through VFS.
Network Stack
Implements the full TCP/IP networking stack inside the kernel. Handles:
- Socket creation and management (
AF_INET,AF_UNIX,AF_NETLINK, …)
✍️ SOCKET
In Linux, a socket is a software abstraction that serves as a bi-directional communication endpoint for exchanging data between two processes. Following the standard Unix philosophy where “everything is a file,” the Linux kernel exposes a socket to applications as a file descriptor (an integer number), allowing programs to read from and write to it using standard system calls.
For more information, see Medium Blog: Socket Programming — Linux.
- Protocol processing: IP, TCP, UDP, ICMP, and higher layers
- Packet filtering and routing (netfilter → iptables/nftables)
- Network namespaces (the foundation of container networking)
ss -tulnp              # socket summary
cat /proc/net/tcp      # raw TCP connection table
ip route show          # kernel routing table
Device Drivers
Drivers translate the generic kernel interfaces (block I/O, character I/O, network frames) into hardware-specific commands. Linux supports two forms:
- Built-in drivers — compiled directly into the kernel image (
vmlinuz)
✍️ VMLINUZ
vmlinuzis the executable, compressed file containing the core Linux kernel. It is booted by the system’s bootloader (like GRUB) to start the operating system. You will typically find it in the/bootdirectory as something likevmlinuz-5.15.137-generic.ls /boot/vmlinuz* # /boot/vmlinuz-5.15.137-generic
- Loadable kernel modules (LKMs) —
.kofiles loaded at runtime withmodprobe
✍️ LOADABLE KERNEL MODULES (LKMs)
Loadable kernel modules are compiled chunks of code that extend the core operating system kernel’s functionality on-demand, without requiring a system reboot. They typically serve as device drivers, filesystem managers, or networking protocols and allow systems to remain lightweight, memory-efficient, and easily customizable.
lsmod                          # list loaded modules
modprobe e1000e                # load a driver module
modinfo e1000e                 # inspect a module
dmesg | grep -i usb            # see driver messages for USB devices
How a System Call Works
When your program calls read(fd, buf, n):
✍️
read(fd, buf, n)— ARGUMENTS
Argument Type Description fdintFile descriptor — an integer handle returned by open(),socket(), orpipe(). It tells the kernel which open resource to read from (0= stdin,1= stdout,2= stderr).bufvoid *Buffer — a pointer to a region of memory in user space where the kernel should copy the data it reads. The caller is responsible for allocating this memory before the call. nsize_tCount — the maximum number of bytes to read. The kernel will read at most nbytes; it may return fewer if fewer are available (e.g. end of file, or a short read from a pipe or socket).The return value is the number of bytes actually read,
0on end-of-file, or-1on error (witherrnoset).
  1. C library (glibc) sets up syscall arguments in CPU registers
  2. Executes the SYSCALL instruction (x86-64) — CPU switches to Ring 0
  3. Kernel's syscall dispatcher looks up the syscall number in the syscall table
  4. Calls sys_read(): validates fd, copies data from kernel buffer to user buffer
  5. Returns to user space via SYSRET — CPU switches back to Ring 3
  6. glibc returns the result to your program
# Trace all system calls made by a process
strace ls /tmp

# Count system calls
strace -c ls /tmp

# Attach to a running process
strace -p 1234
✍️ THE SYSCALL TABLE (x86-64)
The syscall table is a kernel-internal array that maps every syscall number — an integer the CPU receives in a register — to its corresponding kernel function. On x86-64, syscall number
0maps tosys_read,1tosys_write,2tosys_open, and so on up to ~300–400 entries in a typical kernel build. When the CPU executes theSYSCALLinstruction, the kernel’s dispatcher reads that number from theraxregister and jumps to the matching function in this table.You can inspect the table on any Linux system:
# Human-readable syscall names and numbers (Debian/Ubuntu path)
grep "^#define __NR_" /usr/include/x86_64-linux-gnu/asm/unistd_64.h | head -20

# Verify a specific number (e.g. read = 0)
ausyscall x86_64 read
The Kernel and Containers
Containers (Docker, Kubernetes pods) are not separate kernels — they are processes running on the same kernel, isolated using two kernel features:
| Feature | What it does | Example |
|---|---|---|
| Namespaces | Partition global resources so each container sees its own view | PID namespace: container’s init has PID 1 |
| Cgroups | Limit and account for resource usage per group of processes | CPU: max 0.5 cores; Memory: max 512 MiB |
# List namespaces for a process
ls -la /proc/1234/ns/

# Show cgroup limits for a process
cat /proc/1234/cgroup
systemd-cgls
Because all containers share one kernel, a kernel vulnerability affects every container on the host simultaneously — which is the core security difference between containers and virtual machines (VMs run a separate kernel per guest).
Kernel Versioning
uname -r # e.g. 5.15.137-generic
The version format is major.minor.patch-distro:
- Major (
6) — rarely incremented; not meaningful for compatibility - Minor (
8) — incremented with each mainline release (~every 9 weeks) - Patch (
0) — stable backport fixes; incremented frequently - Distro suffix (
35-generic) — downstream patches and build number from the distribution
✍️ STABLE BACKPORT FIX
A stable backport fix is the practice of taking security patches, bug fixes, or feature updates from a newer version of software and porting them to an older version that is still in active use. It allows older software to remain functional, secure, and compatible without requiring an upgrade to a whole new version.
Long-Term Support (LTS) kernels receive backported fixes for 2–6 years. Distributions (Ubuntu, RHEL, Debian) typically ship a patched LTS kernel rather than the latest mainline release.
💡 Interview tip: A common interview question is “what happens when you run a command in a shell?” The answer flows through the kernel: the shell calls
fork()to create a child process, thenexecve()to replace that child with the command’s binary. The kernel loads the binary, sets up its address space, and starts executing it. Every I/O the command does — reading input, writing output — passes through the kernel via system calls. The kernel is the intermediary for every single thing the program does.
Why Would You Need to Compile the Linux Kernel and How to Do It?
Most Linux users never compile the kernel — distributions ship a pre-built kernel that covers the vast majority of hardware and use cases. But there are situations where the built-in kernel is not enough.
Why You Would Need To
| Reason | Explanation |
|---|---|
| Enable hardware support | A new device or peripheral requires a driver that is not included in the distribution’s kernel build |
| Apply a custom or out-of-tree patch | Security researchers, embedded developers, or kernel contributors work with patches that haven’t been merged upstream yet |
| Optimize for a specific workload | Remove unnecessary subsystems (e.g. Bluetooth, Wi-Fi on a dedicated server) to reduce memory footprint and attack surface |
| Enable experimental features | A feature exists in a newer mainline kernel than the distribution ships (e.g. a new filesystem, scheduler improvement, or eBPF feature) |
| Embedded and cross-compilation | Building a minimal kernel for a resource-constrained device (router, IoT, custom ARM board) where the vendor kernel is outdated |
| Learning and development | Contributing patches to the kernel, debugging kernel code, or studying kernel internals |
Prerequisites
# Update repositories
sudo apt update

# Install required build tools (Debian/Ubuntu)
sudo apt install -y \
    build-essential \
    libncurses-dev \
    libc6-dev-i386 \
    libssl-dev \
    libelf-dev \
    flex \
    bison \
    bc \
    dwarves \
    git

# Verify compiler
gcc --version
make --version
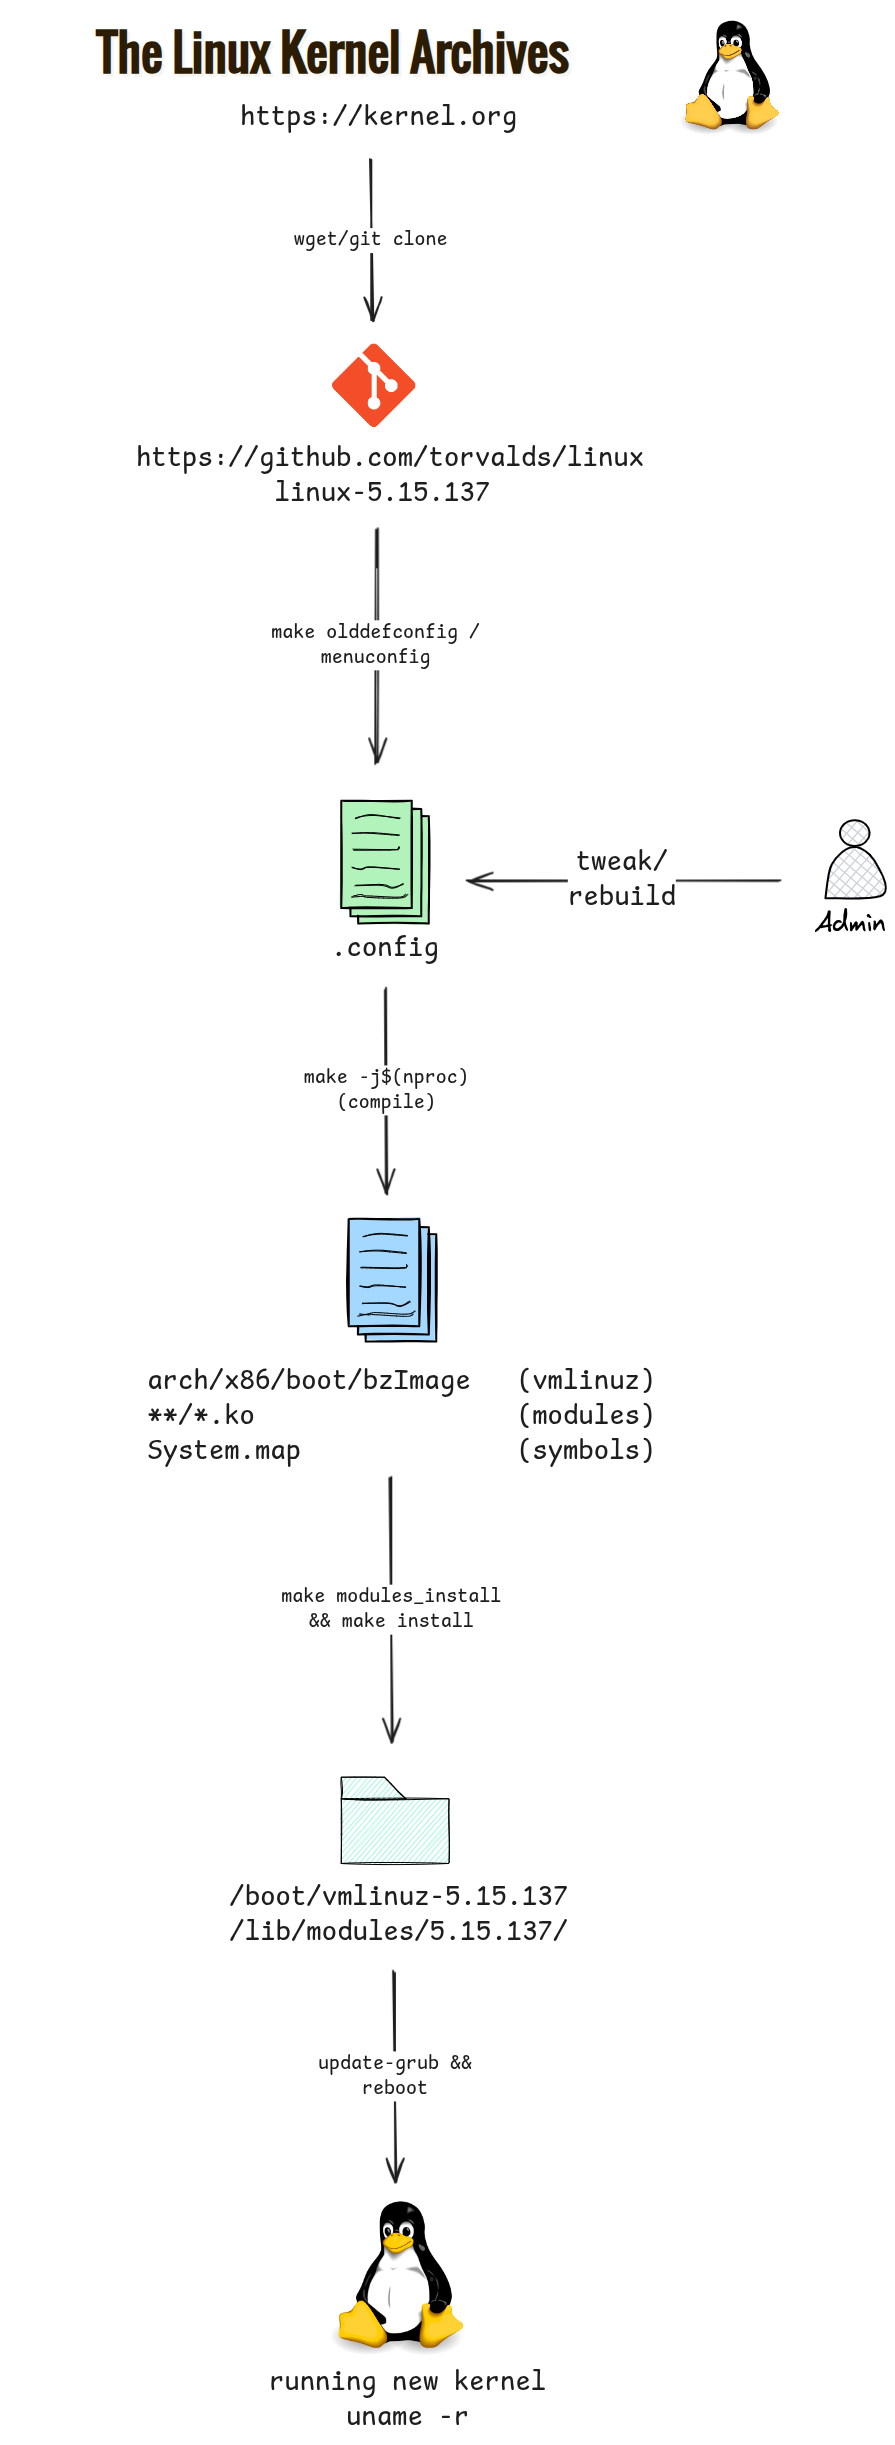
Step 1: Get the Kernel Source
# Download a specific release from kernel.org
wget https://cdn.kernel.org/pub/linux/kernel/v5.x/linux-5.15.137.tar.xz
tar -xf linux-5.15.137.tar.xz
cd linux-5.15.137/

# Or clone the repository
git clone --depth 1 --branch v5.15.137 https://git.kernel.org/pub/scm/linux/kernel/git/stable/linux.git
cd linux
Step 2: Configure the Kernel
The configuration file (.config) controls which features, drivers, and subsystems are compiled in, compiled as modules, or excluded entirely. There are three common starting points:
# Option A — start from your running kernel's config (recommended)
cp /boot/config-$(uname -r) .config
make olddefconfig       # auto-answer new options with defaults

# Option B — interactive menu (ncurses UI)
make menuconfig

# Option C — minimal config for the current hardware only
make localmodconfig     # probes loaded modules and disables everything else
✍️
.configFILEThe
.configfile is a plain-text list ofCONFIG_*variables, each set toy(built-in),m(module), orn(excluded). It is the single source of truth for a kernel build. Everymake menuconfigormake olddefconfigreads and writes this file. You can also edit it directly with a text editor for scripted or automated builds.
Step 3: Build the Kernel
⚠️ IMPORTANT: Disable Module Signing Before Building
As we are building a custom upstream kernel, before starting the compilation process we need to disable module signing certificate enforcement in the
.configfile. By default the copied Ubuntu configuration specifies a strict security policy requiring specific cryptographic certificates (debian/canonical-certs.pem) to sign kernel modules during compilation. As we don’t possess Canonical’s private build certificates, we must skip this step or the build will fail.# Clear the system certificates configuration scripts/config --disable SYSTEM_TRUSTED_KEYS # Clear the revocation certificates configuration scripts/config --disable SYSTEM_REVOCATION_KEYS # Refresh the config state make olddefconfig
This time, the compiler will skip looking for debian/canonical-certs.pem certificates.
# Compile using all available CPU cores
make -j$(nproc)
The -j$(nproc) option tells make to use as many parallel jobs (threads) as you have available processor cores on your system, which can significantly speed up the compilation.
This produces three key output files:
| File | Location | Description |
|---|---|---|
vmlinuz | arch/x86/boot/bzImage | The compressed, bootable kernel image |
System.map | root of source tree | Symbol-to-address map used for debugging |
*.ko | scattered under arch/ and drivers/ | Loadable kernel module files |
Build time ranges from ~5 minutes on a modern workstation to 30+ minutes on older hardware.
Step 4: Install Modules and Kernel
# Install all compiled .ko modules to /lib/modules/<version>/
sudo make modules_install

# Install the kernel image, System.map, and config to /boot/
sudo make install
make install calls /sbin/installkernel which copies the files into /boot/ and typically triggers the bootloader update automatically on distributions that support it.
Step 5: Update the Bootloader and Reboot
# Update GRUB to detect the new kernel entry
sudo update-grub          # Debian/Ubuntu
sudo grub2-mkconfig -o /boot/grub2/grub.cfg   # RHEL/Fedora

# Reboot and select the new kernel from the GRUB menu
sudo reboot

# After reboot — verify the new kernel is running
uname -r
Reverting if Something Goes Wrong
The old kernel remains installed and selectable from the GRUB menu. If the new kernel fails to boot or causes issues:
- Reboot and hold
Shift(BIOS) orEsc(UEFI) to enter the GRUB menu - Select Advanced options and choose the previous working kernel
- Once booted, remove the broken kernel:
sudo apt remove linux-image-5.15.137        # remove broken kernel package
# or manually:
sudo rm /boot/vmlinuz-5.15.137 /boot/initrd.img-5.15.137 /boot/config-5.15.137
sudo update-grub
Full Build Flow
💡 Interview tip: If asked “how do you add support for a new hardware device without rebooting?”, the answer is a loadable kernel module — compile only the driver as a
.koand load it withmodprobe. Compiling the entire kernel is only necessary when the change affects built-in subsystems or the driver cannot be built as a module.
Learn More
💪 PRACTICE
Chapter 2: Permissions
Interview Questions
This chapter answers to the following questions:
- Scenario: SSH Key Rejected — “Unprotected Private Key”
- Scenario: Nginx Returns 403 Forbidden
- Scenario: Docker Bind Mount — Permission Denied Writing /app/data
Linux File Permissions
Every file and directory in Linux has an associated set of permissions that control who can read, write, or execute it. Understanding this system is fundamental to Linux administration and almost always comes up in technical interviews.
The Permission Model
Linux uses a discretionary access control (DAC) model. Each file has three permission classes:
| Class | Applies to |
|---|---|
| User (u) | The file’s owner |
| Group (g) | Members of the file’s group |
| Other (o) | Everyone else |
Each class has three permission bits:
| Permission | Symbol | Octal | On a file | On a directory |
|---|---|---|---|---|
| Read | r | 4 | View file contents | List directory contents (ls) |
| Write | w | 2 | Modify file contents | Create, delete, rename files inside |
| Execute | x | 1 | Run as a program | Enter the directory (cd) |
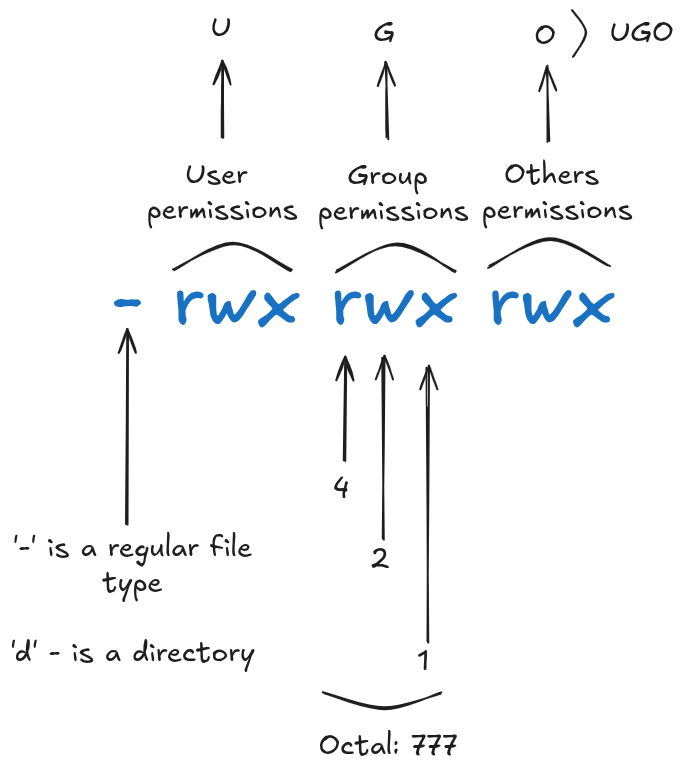
Reading the Permission String
Run ls -l to see permissions:
-rwxr-xr-- 1 alice devs 4096 May 30 10:00 script.sh
Break down the first field, -rwxr-xr--:
- rwx r-x r--
│ │   │   └── Other:  read only
│ │   └────── Group:  read + execute
│ └────────── User:   read + write + execute
└──────────── File type: - (regular file)
File type characters:
| Symbol | Type |
|---|---|
- | Regular file |
d | Directory |
l | Symbolic link |
c | Character device |
b | Block device |
p | Named pipe (FIFO) |
s | Socket |
Octal (Numeric) Notation
Each permission class is represented as a 3-bit binary number, summed into a single octal digit:
rwx = 4+2+1 = 7
r-x = 4+0+1 = 5
r-- = 4+0+0 = 4
So -rwxr-xr-- = 754.
Common permission values:
| Octal | Binary | Symbolic | Meaning |
|---|---|---|---|
777 | 111 111 111 | rwxrwxrwx | Full access for everyone |
755 | 111 101 101 | rwxr-xr-x | Owner full; others read/exec |
644 | 110 100 100 | rw-r--r-- | Owner read/write; others read |
600 | 110 000 000 | rw------- | Owner read/write only |
700 | 111 000 000 | rwx------ | Owner full, no one else |
Changing Permissions: chmod
Symbolic mode — readable and expressive:
chmod u+x script.sh        # add execute for owner
chmod g-w file.txt         # remove write from group
chmod o=r file.txt         # set other to read-only exactly
chmod a+r file.txt         # add read for all (a = ugo)
chmod u+x,g-w file.txt     # multiple changes at once
Numeric mode — precise and scriptable:
chmod 755 script.sh        # rwxr-xr-x
chmod 644 config.conf      # rw-r--r--
chmod 600 ~/.ssh/id_rsa    # rw------- (required by SSH)
Recursive:
chmod -R 755 /var/www/html
💡 Interview tip: Prefer numeric mode in scripts for clarity and predictability; prefer symbolic mode when doing targeted, additive changes interactively.
Changing Ownership: chown and chgrp
chown alice file.txt             # change owner to alice
chown alice:devs file.txt        # change owner and group
chown :devs file.txt             # change group only
chgrp devs file.txt              # change group (equivalent)
chown -R alice:devs /srv/app     # recursive
Only the root user (or a process with CAP_CHOWN capability) can change a file’s owner. A regular user can only change the group of a file they own, and only to a group they belong to.
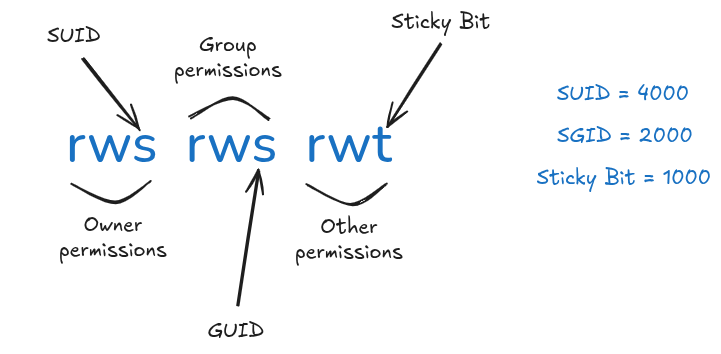
Special Permission Bits
Beyond rwx, there are three special bits that modify execution behavior:
setuid (SUID) — octal 4000
When set on an executable file, the process runs with the file owner’s privileges instead of the invoking user’s.
chmod u+s /usr/bin/passwd   # symbolic
chmod 4755 /usr/bin/passwd  # numeric
In ls -l output, the owner execute bit shows s (or S if execute is not set):
-rwsr-xr-x root root /usr/bin/passwd
passwdis the classic example: a normal user needs to write to/etc/shadow(owned by root), so the binary runs as root via SUID.
On a directory, SUID has no standard effect on Linux.
setgid (SGID) — octal 2000
On an executable file, the process runs with the file’s group privileges.
On a directory, new files created inside inherit the directory’s group instead of the creator’s primary group — essential for shared project directories.
chmod g+s /srv/shared        # symbolic
chmod 2775 /srv/shared       # numeric
In ls -l, the group execute bit shows s:
drwxrwsr-x alice devs /srv/shared
Sticky Bit — octal 1000
On a directory, only the file’s owner, the directory’s owner, or root can delete or rename files within it — even if others have write permission on the directory.
chmod +t /tmp               # symbolic
chmod 1777 /tmp             # numeric
In ls -l, the other execute bit shows t:
drwxrwxrwt root root /tmp
/tmpis the canonical example: world-writable but protected so users can’t delete each other’s files.
Summary of special bits:
| Bit | Octal | On file | On directory |
|---|---|---|---|
| SUID | 4000 | Run as file owner | No standard effect |
| SGID | 2000 | Run as file group | New files inherit directory group |
| Sticky | 1000 | No standard effect | Only owner can delete/rename files |
The umask
The umask defines which permission bits are removed from the default when a new file or directory is created.
Default creation modes:
- Files:
0666(no execute by default) - Directories:
0777
With a umask of 0022:
- Files created as:
0666 - 0022 = 0644(rw-r--r--) - Directories created as:
0777 - 0022 = 0755(rwxr-xr-x)
umask           # display current umask
umask 0027      # set new umask (files: 0640, dirs: 0750)
umask -S        # display in symbolic form (u=rwx,g=rx,o=)
The umask is subtracted bitwise, not arithmetically. Think of it as a mask of bits to clear, not a number to subtract.
Access Control Lists (ACLs)
Standard Unix permissions allow only one owner and one group per file. ACLs extend this by allowing per-user and per-group rules.
# View ACLs
getfacl file.txt

# Grant bob read+write
setfacl -m u:bob:rw file.txt

# Grant the ops group read-only
setfacl -m g:ops:r file.txt

# Remove bob's ACL entry
setfacl -x u:bob file.txt

# Remove all ACL entries
setfacl -b file.txt
When ACLs are present, ls -l shows a + after the permission string:
-rw-rw-r--+ alice devs file.txt
Scenario: SSH Key Rejected — “Unprotected Private Key”
The Situation
You have generated an SSH key pair and are trying to connect to a remote server:
ssh -i ~/.ssh/id_rsa alice@remote-server.example.com
Instead of connecting, you receive this error:
@@@@@@@@@@@@@@@@@@@@@@@@@@@@@@@@@@@@@@@@@@@@@@@@@@@@@@@@@@@
@         WARNING: UNPROTECTED PRIVATE KEY FILE!          @
@@@@@@@@@@@@@@@@@@@@@@@@@@@@@@@@@@@@@@@@@@@@@@@@@@@@@@@@@@@
Permissions 0644 for '/home/alice/.ssh/id_rsa' are too open.
It is required that your private key files are NOT accessible by others.
This private key will be ignored.
Load key "/home/alice/.ssh/id_rsa": bad permissions
alice@remote-server.example.com: Permission denied (publickey).
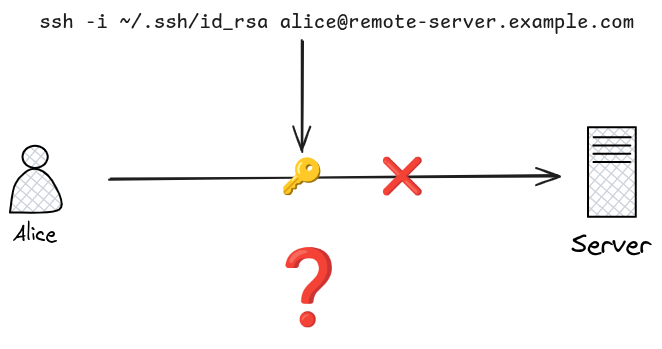
Diagnosis
SSH refuses to use any private key file that other users can read. The error message tells you exactly what is wrong: the key file at ~/.ssh/id_rsa has permissions 0644 (rw-r--r--), meaning the group and other classes can read it.
This is a deliberate security enforcement built into the SSH client. A private key readable by others is considered compromised — any user on the same system could copy it and impersonate you.
Check the current permissions to confirm:
ls -la ~/.ssh/
You might see something like:
drwxr-xr-x  alice  alice  .ssh/
-rw-r--r--  alice  alice  id_rsa        ← too open (0644)
-rw-r--r--  alice  alice  id_rsa.pub
Solution
Restrict the private key so only the owner can read it:
chmod 600 ~/.ssh/id_rsa
This sets permissions to rw-------: only the owner can read or write the file. Group and other have zero access, satisfying SSH’s requirement.
While you’re there, fix the .ssh directory itself if needed:
chmod 700 ~/.ssh
Then retry:
ssh -i ~/.ssh/id_rsa alice@remote-server.example.com
Why SSH Enforces This
SSH operates on the principle that a private key is a secret credential. If the file is world-readable or group-readable, any process or user sharing the system could read your key and use it to authenticate as you to any server that trusts it.
Unlike a password (which is verified by the remote server), a private key never leaves your machine — the client uses it to sign a challenge. There is no server-side rate limiting or lockout to protect against a stolen key. Once someone has a copy, they have permanent access until you revoke the public key on every remote server. SSH therefore refuses to proceed rather than silently use a key that may already be compromised.
Reference: Correct .ssh Permissions
| Path | Permission | Reason |
|---|---|---|
~/.ssh/ | 700 | Only owner can enter or list the directory |
~/.ssh/id_rsa | 600 | Private key — owner read/write only |
~/.ssh/id_ed25519 | 600 | Same rule applies to all private key formats |
~/.ssh/id_rsa.pub | 644 | Public key — safe to be world-readable |
~/.ssh/authorized_keys | 600 | SSHd rejects looser permissions on this file too |
~/.ssh/known_hosts | 644 | Readable by owner; group/other read is acceptable |
~/.ssh/config | 600 | May contain IdentityFile paths and proxy settings |
Apply all of these at once with:
chmod 700 ~/.ssh
chmod 600 ~/.ssh/id_rsa ~/.ssh/id_ed25519 ~/.ssh/authorized_keys ~/.ssh/config
chmod 644 ~/.ssh/id_rsa.pub ~/.ssh/id_ed25519.pub ~/.ssh/known_hosts
💡 Interview tip: If you are asked why SSH authentication fails even when the key pair is correct, permissions on
~/.ssh/authorized_keyson the remote server are the second most common culprit after the private key itself.SSHdwill silently ignoreauthorized_keysif it is group-writable or world-writable.
Scenario: Nginx Returns 403 Forbidden
The Situation
You have configured Nginx to serve a static site. The config looks correct and the HTML file is present on disk, but every request returns a 403 Forbidden error:
server {
    listen 80;
    server_name example.com;

    root /home/alice/mysite;
    index index.html;
}
curl -I http://example.com/
# HTTP/1.1 403 Forbidden
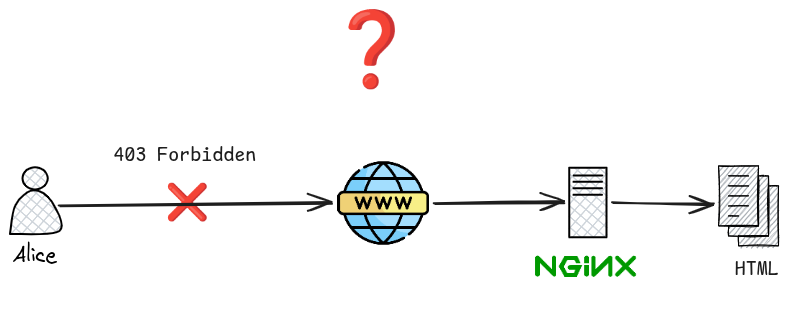
Diagnosis
A 403 means Nginx can find the location but is denied permission to read it. Because the file visibly exists, the instinct is to check the file itself — but the real cause is almost always further up the directory tree.
Nginx runs as a system user (typically www-data on Debian/Ubuntu, nginx on RHEL/CentOS). To serve /home/alice/mysite/index.html, that user must be able to:
- Execute (
x) every directory in the path —/home/,/home/alice/,/home/alice/mysite/ - Read (
r) the file itself —index.html
Failing either check at any level produces a 403. The file’s own permissions are fine to check, but the home directory is the most common culprit.
Check what Nginx is actually blocked on by inspecting the error log:
tail -f /var/log/nginx/error.log
You will see a line like:
[error] 1234#0: *1 open() "/home/alice/mysite/index.html" failed (13: Permission denied)
Now trace the directory permissions from the root down:
ls -la /home/
ls -la /home/alice/
ls -la /home/alice/mysite/
ls -la /home/alice/mysite/index.html
A typical home directory looks like this by default:
drwx------ alice alice /home/alice/
700 — only the owner can enter. www-data hits a wall at this directory and never reaches mysite/.
Solution
You need to grant the execute bit on each directory in the path to the user Nginx runs as. There are two approaches:
Option 1 — Add world-execute to the blocking directory (simplest)
chmod o+x /home/alice
This allows any user — including www-data — to traverse into /home/alice. It does not grant read access (they cannot ls the home directory), only traversal.
chmod o+x /home/alice/mysite
chmod o+r /home/alice/mysite/index.html   # if the file itself is also restricted
Option 2 — Add Nginx’s user to the owner’s group (more controlled)
# Add www-data to alice's group
usermod -aG alice www-data

# Grant group execute on the directories
chmod g+x /home/alice
chmod g+x /home/alice/mysite

# Grant group read on the files
chmod -R g+r /home/alice/mysite
Changes to group membership take effect on the next login/session for that user. Reload Nginx after any permission or group change:
systemctl reload nginx
Option 3 — Move the web root outside the home directory (best practice)
Serving files from inside a user’s home directory is the root cause of this class of problem. The standard solution is to host web content under a dedicated directory:
sudo mkdir -p /var/www/mysite
sudo cp -r /home/alice/mysite/* /var/www/mysite/
sudo chown -R www-data:www-data /var/www/mysite
sudo chmod -R 755 /var/www/mysite
Then update the Nginx config:
root /var/www/mysite;
Why Execute on Directories Matters
The read (r) and execute (x) bits mean very different things on directories:
| Bit | On a directory |
|---|---|
r | List the contents of the directory (ls) |
x | Traverse into the directory — required to access anything inside it |
A process that lacks x on a directory cannot open, stat, or read any file within it, even if it knows the exact filename. This is why a 403 can occur even when the file itself has world-read permission: the kernel rejects the path traversal before it ever reaches the file.
Reference: Standard Nginx Web Root Permissions
| Path | Owner | Permission | Reason |
|---|---|---|---|
/var/www/ | root:root | 755 | Base directory, traversable by all |
/var/www/mysite/ | www-data:www-data | 755 | Nginx user owns the web root |
/var/www/mysite/*.html | www-data:www-data | 644 | Nginx reads files; no execute needed |
/var/www/mysite/uploads/ | www-data:www-data | 755 | If Nginx writes here, owner must match |
💡 Interview tip: When debugging a 403, always check the Nginx error log first — it names the exact path and errno. Then walk the directory tree from
/down to the file checking for missingxbits on each directory, not just the file itself.
Scenario: Docker Bind Mount — Permission Denied Writing /app/data
The Situation
You have a Dockerized application that writes output files to /app/data. You use a bind mount so the files are accessible on the host:
docker run -v /home/alice/data:/app/data myapp
The container starts, but as soon as the application tries to write a file it crashes with:
PermissionError: [Errno 13] Permission denied: '/app/data/output.csv'
Or, from inside the container:
docker exec -it myapp_container touch /app/data/test
# touch: cannot touch '/app/data/test': Permission denied
The directory /home/alice/data clearly exists on the host and Alice can write to it.
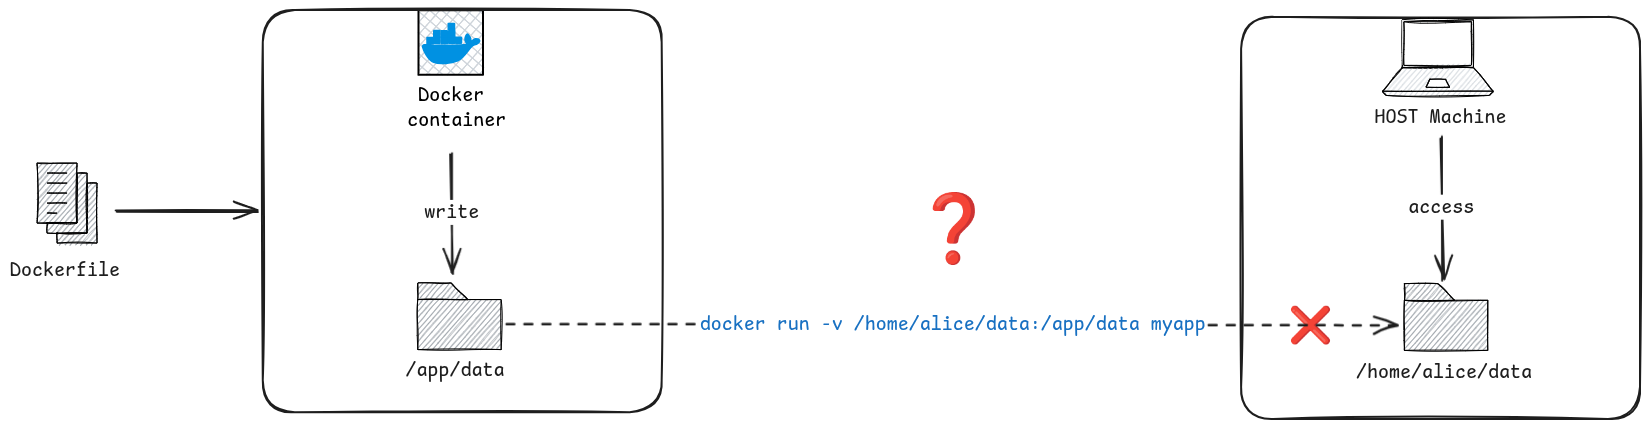
Diagnosis
The key insight is that bind mounts expose the host filesystem directly into the container with no UID translation. The kernel enforces the same ownership and permission rules inside the container as it does on the host — the only thing that changes is the path.
Check what user the container process is running as:
docker exec -it myapp_container id
# uid=1001(appuser) gid=1001(appuser)
Now check who owns the host directory:
ls -la /home/alice/
# drwxr-xr-x  alice  alice  data/
# (alice has uid=1000)
The container process runs as UID 1001 (appuser). The host directory is owned by UID 1000 (alice) with permissions 755 — group and other can only read and traverse, not write. UID 1001 falls into the “other” class and has no write permission.
This is the core mismatch:
Host directory owner: UID 1000  (alice)
Container process:    UID 1001  (appuser)
Directory permission: 755  →  other = r-x  →  no write
You can verify this without even entering the container:
# Find out the UID the container process runs as
docker inspect myapp_container --format '{{.Config.User}}'

# Or check the Dockerfile
grep -i user Dockerfile
Solution
There are four approaches, ordered from quick fix to best practice.
Option 1 — chown the host directory to match the container UID
sudo chown -R 1001:1001 /home/alice/data
The container process (UID 1001) now owns the directory and can write freely. The trade-off: the directory on the host is owned by a UID that may not correspond to a named user on the host system.
Option 2 — Run the container as the host user
Pass --user to make the container process run as the current host user:
docker run --user $(id -u):$(id -g) -v /home/alice/data:/app/data myapp
$(id -u) expands to Alice’s UID (1000) at runtime. The container process now has the same UID as the host directory owner and can write to it. This requires the application inside the container to be able to run as an arbitrary UID (it must not rely on a named user or /etc/passwd entry).
Option 3 — Set the UID in the Dockerfile
If you control the image, align the container user’s UID with the expected host UID at build time:
FROM python:3.12-slim

# Create appuser with UID 1000 to match the host
RUN groupadd -g 1000 appuser && \
    useradd -u 1000 -g appuser -s /bin/sh appuser

WORKDIR /app
COPY . .

USER appuser
# Host directory already owned by UID 1000 (alice) — no chown needed
docker run -v /home/alice/data:/app/data myapp
This is the most portable solution: the image is self-documenting about which UID it expects, and the host directory needs no special preparation beyond normal ownership.
Option 4 — Use a named volume instead of a bind mount
If the application only needs to persist data (not share it with a specific host path), use a Docker-managed named volume:
docker run -v myapp_data:/app/data myapp
Docker creates the volume and sets ownership to the container’s user automatically. There is no host UID involved. Access the data from the host via:
docker run --rm -v myapp_data:/data alpine ls /data
Why UIDs Are Just Numbers
Linux identifies file owners by UID integer, not by username. Usernames are resolved from /etc/passwd only for display. Inside a container, /etc/passwd is the container’s own file, entirely separate from the host’s.
# On the host
id alice
# uid=1000(alice) gid=1000(alice)

# Inside the container — same UID, different name
docker exec myapp_container id 1000
# uid=1000(appuser) gid=1000(appuser)   ← different username, same UID
When the container process (UID 1001) tries to write to a directory owned by UID 1000, the kernel sees two different UIDs and applies the “other” permission bits — regardless of what names appear in either /etc/passwd. The container boundary is irrelevant to the kernel’s permission check; only the UID numbers matter.
Reference: Diagnosing Bind Mount Permission Errors
# 1. Find the UID the container runs as
docker inspect <container> --format '{{.Config.User}}'
docker exec <container> id

# 2. Check host directory ownership
ls -lan /host/path   # -n shows numeric UIDs, bypassing name resolution

# 3. Compare — if UIDs differ, that is the problem
#    owner UID != process UID  →  "other" bits apply

# 4. Check what the kernel sees at mount time
docker exec <container> ls -lan /app/data
💡 Interview tip: Always use
ls -ln(numeric UIDs) when debugging cross-container or cross-host permission problems. Username display hides the actual mismatch — two users namedappuseron different systems may have completely different UIDs, while two users with different names but the same UID have identical access rights.
Chapter 4: Storage
Interview Questions
This chapter answers to the following questions:
What is LVM and What Are Its Use Cases?
LVM (Logical Volume Manager) is a storage abstraction layer in Linux that sits between raw physical disks and the filesystems that use them. Instead of partitioning a disk directly and formatting it, you pool one or more physical disks (or partitions) under LVM’s control and carve out logical volumes from that pool. The filesystem has no idea how many physical disks are underneath — it just sees a block device of the size you asked for.
LVM introduces three layers of abstraction:
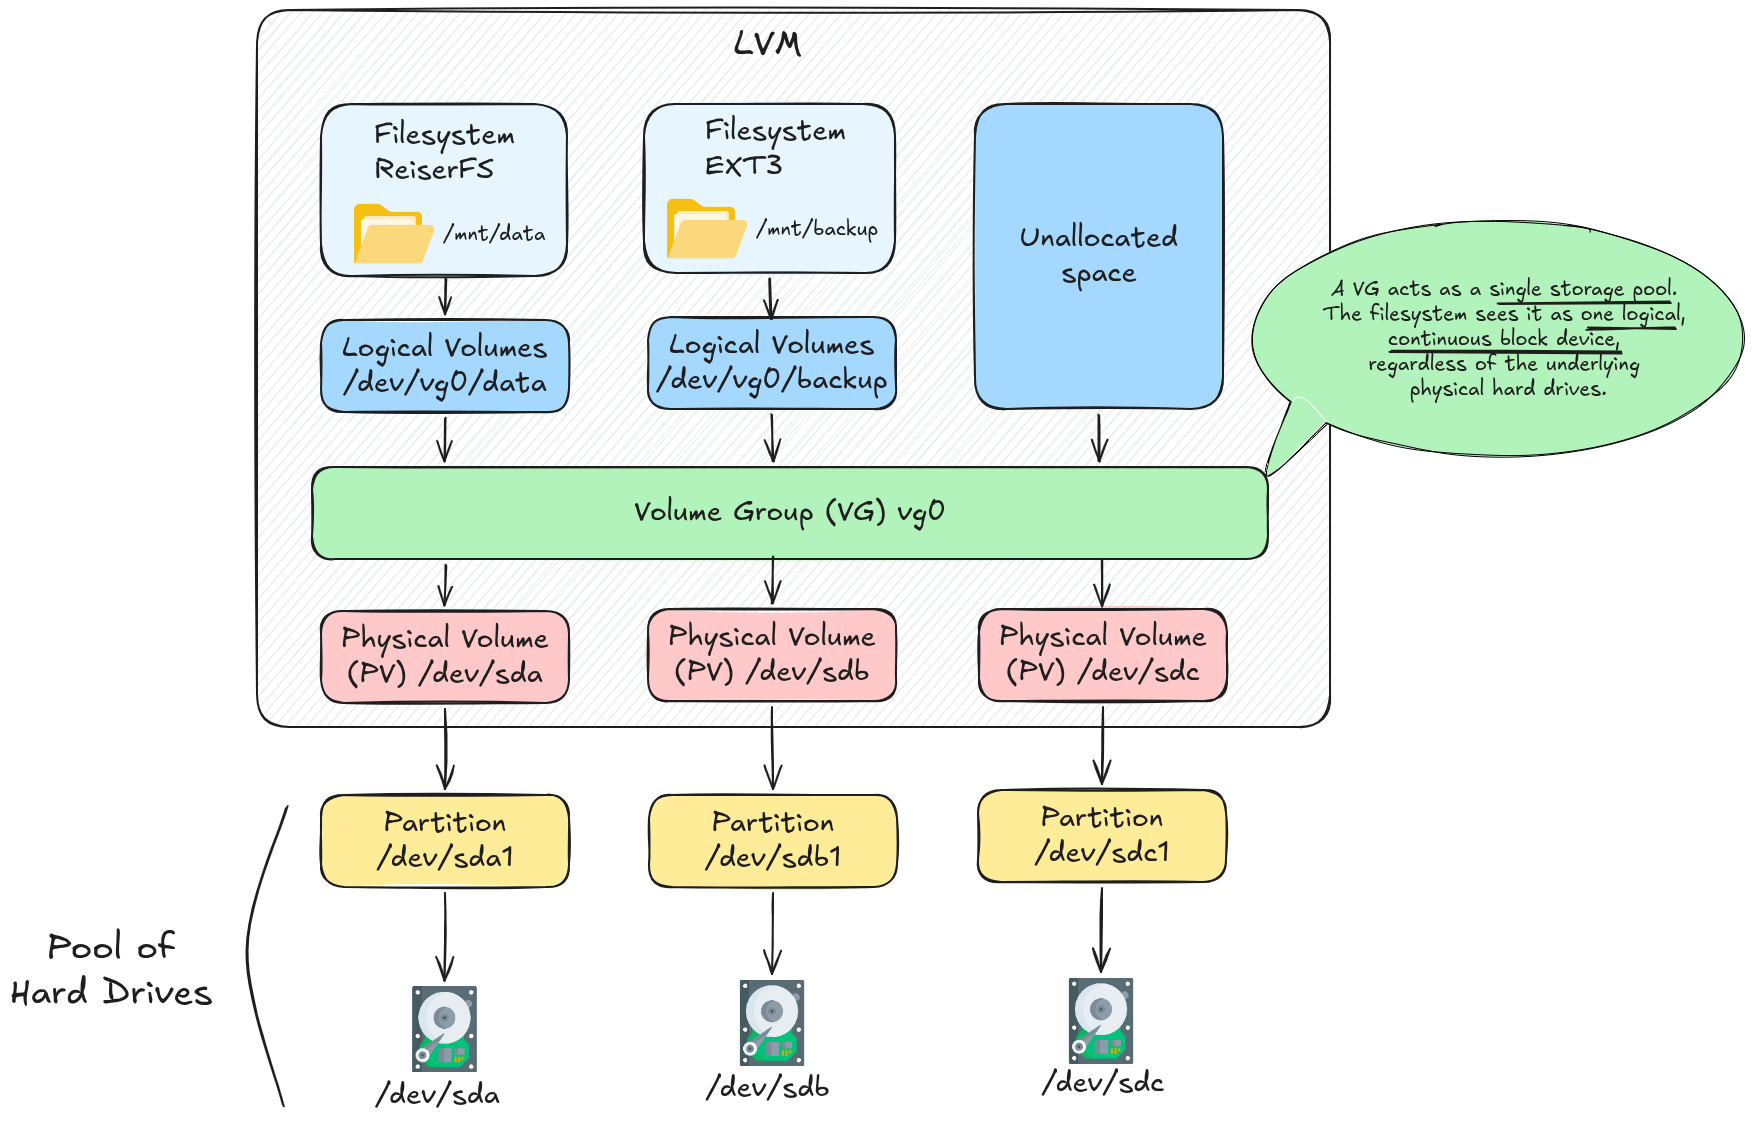
The Three Layers
Physical Volume (PV)
A Physical Volume is a raw disk or partition that has been initialised for LVM use. LVM writes a small metadata header to it and divides the rest into fixed-size chunks called Physical Extents (PEs) (default 4 MiB each).
pvcreate /dev/sdb              # initialise a disk as a PV
pvcreate /dev/sdc1             # or a partition
pvs                            # list PVs
pvdisplay /dev/sdb             # detailed info
Volume Group (VG)
A Volume Group aggregates one or more PVs into a single storage pool. All PEs from every member PV are available to the group. The VG is the unit of administration — you add capacity by adding a new PV to the VG.
vgcreate vg0 /dev/sdb /dev/sdc   # create VG from two PVs
vgextend vg0 /dev/sdd            # add a third disk later
vgs                              # list VGs
vgdisplay vg0                    # detailed info
Logical Volume (LV)
A Logical Volume is a virtual block device allocated from the VG’s pool of extents. It appears as /dev/vg0/lvname (or /dev/mapper/vg0-lvname), can be formatted with any filesystem, and mounted like any other block device.
lvcreate -L 50G -n data vg0      # create a 50 GiB LV named "data"
lvcreate -l 100%FREE -n backup vg0  # use all remaining space
lvs                              # list LVs
lvdisplay /dev/vg0/data          # detailed info

mkfs.ext4 /dev/vg0/data          # format
mount /dev/vg0/data /mnt/data    # mount
Key Concepts
Linear vs Striped Layouts
By default, LVM writes data linearly: it fills one PV before moving on to the next. You can alternatively create a striped LV that distributes writes across multiple PVs simultaneously, improving throughput at the cost of availability (like RAID 0):
# Striped LV across 3 PVs, 256 KiB stripe size
lvcreate -L 100G -n fastdata -i 3 -I 256 vg0
Use Cases
1. Resize Filesystems Without Downtime
The most common reason to use LVM. With raw partitions, running out of space on /var means repartitioning, which usually requires a reboot and risks data loss. With LVM, you extend a Logical Volume and grow the filesystem in seconds — often while the volume is mounted.
Extend a Logical Volume and its filesystem:
# Step 1: extend the LV by 20 GiB
lvextend -L +20G /dev/vg0/data

# Step 2: grow the filesystem to fill the new space
resize2fs /dev/vg0/data          # ext4
xfs_growfs /mnt/data             # xfs (must be mounted)
Or do both in one command:
lvextend -L +20G --resizefs /dev/vg0/data
Shrink (ext4 only; XFS cannot shrink):
umount /mnt/data
e2fsck -f /dev/vg0/data          # check filesystem first
resize2fs /dev/vg0/data 30G      # shrink filesystem to 30 GiB
lvreduce -L 30G /dev/vg0/data    # shrink LV to match
mount /dev/vg0/data /mnt/data
Always shrink the filesystem first, then the LV. Always grow the LV first, then the filesystem. Reversing the order truncates data.
2. Add Disk Capacity on the Fly
When a server runs low on disk space, you can plug in a new disk and add it to an existing VG — no rebooting, no reformatting, no downtime:
pvcreate /dev/sdd                # prepare new disk
vgextend vg0 /dev/sdd            # add to the pool
lvextend -L +100G --resizefs /dev/vg0/data  # take some of the new space
3. Snapshots for Consistent Backups
LVM can create a snapshot of a Logical Volume — a point-in-time copy that uses copy-on-write (CoW). Only blocks that change after the snapshot is taken are duplicated; unchanged blocks are shared. This means a snapshot of a 100 GiB volume is nearly instant and consumes almost no space initially.
# Create a 5 GiB snapshot of /dev/vg0/data
lvcreate -L 5G -s -n data_snap /dev/vg0/data

# Mount it read-only and back it up
mount -o ro /dev/vg0/data_snap /mnt/snap
rsync -av /mnt/snap/ /backup/data/

# Unmount and remove the snapshot when done
umount /mnt/snap
lvremove /dev/vg0/data_snap
The original volume continues serving live traffic during the backup. If the snapshot fills its allocated space before you remove it, it becomes invalid — size the snapshot generously or use lvextend to grow it if needed.
4. Migrate Data Between Physical Disks
pvmove relocates Physical Extents from one PV to another while the Logical Volume remains mounted. This lets you replace a failing disk or retire old hardware without any downtime:
# Move all data off /dev/sdb to remaining PVs in the VG
pvmove /dev/sdb

# Or move a specific LV's data only
pvmove -n /dev/vg0/data /dev/sdb /dev/sdc

# Once pvmove completes, remove the PV from the VG and decommission it
vgreduce vg0 /dev/sdb
pvremove /dev/sdb
5. Thin Provisioning
Thin provisioning is a storage management technique that allocates physical disk space to applications or virtual machines dynamically as data is written, rather than reserving the entire requested capacity upfront. This approach optimizes storage utilization, reduces hardware costs, and allows administrators to allocate more virtual storage than physically exists.
# Create a thin pool of 200 GiB from the VG
lvcreate -L 200G --thinpool mypool vg0

# Create thin LVs totalling 500 GiB from the 200 GiB pool
lvcreate -V 100G --thin -n vm1 vg0/mypool
lvcreate -V 100G --thin -n vm2 vg0/mypool
lvcreate -V 100G --thin -n vm3 vg0/mypool
lvcreate -V 100G --thin -n vm4 vg0/mypool
lvcreate -V 100G --thin -n vm5 vg0/mypool
Common in VM host environments where VMs are provisioned with generous disk quotas but rarely use their full allocation.
LVM vs Direct Partitioning
| Feature | Raw Partitions | LVM |
|---|---|---|
| Resize without reboot | No | Yes (grow always; shrink ext4) |
| Span multiple disks | No (RAID aside) | Yes, transparently |
| Add disk capacity live | No | Yes (vgextend) |
| Point-in-time snapshots | No | Yes (lvcreate -s) |
| Migrate data between disks | Requires rsync + downtime | Yes (pvmove) |
| Thin provisioning | No | Yes (thin pools) |
| Complexity | Low | Medium |
Boot partition (/boot) | Fine | Avoid — most bootloaders don’t support LVM |
/bootis typically kept on a plain partition outside LVM because GRUB must read it before the LVM tools are loaded by the initramfs.
Useful Diagnostic Commands
pvs                            # summary of all PVs
vgs                            # summary of all VGs
lvs                            # summary of all LVs

pvdisplay                      # verbose PV info including PE layout
vgdisplay                      # verbose VG info
lvdisplay                      # verbose LV info

lsblk                          # block device tree — shows PV/VG/LV relationships
dmsetup ls --tree              # device-mapper tree (what LVM uses underneath)

vgck vg0                       # check VG metadata consistency
💡 Interview tip: A common interview question is “how would you recover space when a partition is full in production?” The LVM answer is: add a new disk with
pvcreate+vgextend, then grow the LV withlvextend --resizefs— all without unmounting or rebooting. Contrast this with the raw-partition answer, which involves repartitioning or moving data, both of which require downtime.
💡 PRACTICE
⬆️ Advanced: LVM: Extending Disk Space for a Database Server
Chapter 5: Security
Interview Questions
This chapter answers to the following questions:
How Do You Harden SSH on a Linux Server?
SSH (Secure Shell) is the primary remote access protocol on Linux servers. Because it is almost always exposed to the network, it is also one of the most targeted services — brute-force attacks, credential stuffing, and exploit attempts against outdated SSH daemons are constant. Hardening SSH means reducing the attack surface by disabling what is not needed and enforcing what is.
All SSH server configuration lives in a single file:
/etc/ssh/sshd_config
After any change, reload the daemon to apply it without dropping active sessions:
sudo sshd -t                  # test config syntax before applying
sudo systemctl reload sshd    # apply without dropping active sessions
⚠️ IMPORTANT: KEEP A SECOND SESSION OPEN
Always keep an existing SSH session open while testing configuration changes. If you make a mistake that locks you out, the live session lets you recover without needing console access.
Disable Root Login
Direct root login over SSH gives an attacker a known username with full system privileges. Disable it and use a regular user with sudo instead.
# /etc/ssh/sshd_config
PermitRootLogin no
| Value | Behaviour |
|---|---|
no | Root cannot log in at all |
prohibit-password | Root can log in with a key only (not password) |
yes | Root can log in with password or key (default on some distros — avoid) |
Enforce Key-Based Authentication and Disable Passwords
Password authentication is vulnerable to brute-force attacks. Key-based authentication replaces the password with a cryptographic key pair that cannot be guessed.
# /etc/ssh/sshd_config
PubkeyAuthentication yes
PasswordAuthentication no
AuthenticationMethods publickey
Before disabling passwords, make sure your public key is installed on the server:
# On your local machine
ssh-copy-id -i ~/.ssh/id_ed25519.pub user@server

# Or manually on the server
mkdir -p ~/.ssh && chmod 700 ~/.ssh
echo "<your-public-key>" >> ~/.ssh/authorized_keys
chmod 600 ~/.ssh/authorized_keys
✍️ ED25519 VS RSA
Prefer
ed25519keys overrsafor new key pairs. Ed25519 uses elliptic-curve cryptography, producing smaller keys that are faster to verify and considered more secure than RSA-2048 at equivalent strength. Generate one withssh-keygen -t ed25519.
Restrict Which Users and Groups Can Log In
Limit SSH access to only the accounts that need it. Even if another account’s credentials are compromised, it cannot be used to get in.
# /etc/ssh/sshd_config

# Allow only specific users
AllowUsers alice bob deploy

# Or allow all members of a group (pick one approach)
AllowGroups sshusers
# Create the group and add users to it
sudo groupadd sshusers
sudo usermod -aG sshusers alice
Change the Default Port
Port 22 is scanned continuously by automated bots. Moving SSH to a non-standard port does not improve security fundamentally, but it eliminates nearly all automated noise from logs and reduces exposure to opportunistic scanners.
# /etc/ssh/sshd_config
Port 2222
Update your firewall and ~/.ssh/config on client machines accordingly:
# ~/.ssh/config (on your local machine)
Host myserver
    HostName server.example.com
    Port 2222
    User alice
    IdentityFile ~/.ssh/id_ed25519
✍️ SECURITY THROUGH OBSCURITY
Changing the port is not a security control — a targeted attacker will port-scan and find it. It is a noise reduction measure. Never rely on it as a substitute for strong authentication or firewall rules.
Set an Idle Session Timeout
Unattended SSH sessions are an open door. Terminate idle connections automatically.
# /etc/ssh/sshd_config
ClientAliveInterval 300     # send keepalive every 300 seconds (5 min)
ClientAliveCountMax 2       # disconnect after 2 missed keepalives (10 min total)
The server sends a keepalive packet every ClientAliveInterval seconds. If the client does not respond ClientAliveCountMax times in a row, the connection is terminated.
Disable Unused Features
Each enabled feature is a potential attack surface. Disable everything your server does not use.
# /etc/ssh/sshd_config

X11Forwarding no            # disable GUI forwarding (almost never needed on servers)
AllowTcpForwarding no       # disable tunnel/proxy use unless required
AllowAgentForwarding no     # disable SSH agent forwarding
PermitEmptyPasswords no     # never allow accounts with no password
PrintMotd no                # suppress message of the day (minor noise reduction)
MaxAuthTries 3              # lock out after 3 failed attempts per connection
LoginGraceTime 30           # disconnect unauthenticated sessions after 30 seconds
Enforce Strong Cryptography
Older SSH implementations support weak ciphers and MAC algorithms retained for compatibility. Explicitly allow only modern, strong algorithms.
# /etc/ssh/sshd_config
KexAlgorithms curve25519-sha256,diffie-hellman-group16-sha512
Ciphers chacha20-poly1305@openssh.com,aes256-gcm@openssh.com,aes128-gcm@openssh.com
MACs hmac-sha2-512-etm@openssh.com,hmac-sha2-256-etm@openssh.com
Verify what your current server supports:
ssh -Q kex       # supported key exchange algorithms
ssh -Q cipher    # supported ciphers
ssh -Q mac       # supported MACs
Block Brute-Force Attacks with fail2ban
fail2ban monitors SSH log entries and temporarily bans IPs that exceed a threshold of failed authentication attempts.
sudo apt install fail2ban

# /etc/fail2ban/jail.local
[sshd]
enabled  = true
port     = 2222          # match your SSH port
maxretry = 5             # ban after 5 failures
bantime  = 3600          # ban for 1 hour
findtime = 600           # within a 10-minute window
sudo systemctl enable --now fail2ban

# Check ban status
sudo fail2ban-client status sshd

# Unban an IP manually
sudo fail2ban-client set sshd unbanip 1.2.3.4
Restrict SSH Access at the Firewall
Only allow SSH connections from known, trusted IP ranges. Everything else should be dropped before it reaches sshd.
# UFW (Ubuntu/Debian)
sudo ufw allow from 10.0.0.0/8 to any port 2222
sudo ufw deny 2222

# iptables
sudo iptables -A INPUT -p tcp --dport 2222 -s 10.0.0.0/8 -j ACCEPT
sudo iptables -A INPUT -p tcp --dport 2222 -j DROP
Hardened sshd_config Reference
A complete minimal hardened configuration for an Ubuntu server:
Port 2222
PermitRootLogin no
PubkeyAuthentication yes
PasswordAuthentication no
AuthenticationMethods publickey
PermitEmptyPasswords no
AllowUsers alice deploy
X11Forwarding no
AllowTcpForwarding no
AllowAgentForwarding no
MaxAuthTries 3
LoginGraceTime 30
ClientAliveInterval 300
ClientAliveCountMax 2
KexAlgorithms curve25519-sha256,diffie-hellman-group16-sha512
Ciphers chacha20-poly1305@openssh.com,aes256-gcm@openssh.com
MACs hmac-sha2-512-etm@openssh.com,hmac-sha2-256-etm@openssh.com
Verification Checklist
# Confirm sshd is running with the expected config
sudo sshd -T | grep -E "permitrootlogin|passwordauthentication|port|allowusers"

# Check which port sshd is listening on
ss -tlnp | grep sshd

# Inspect recent authentication attempts
sudo journalctl -u ssh --since "1 hour ago" | grep -i "failed\|accepted"

# Scan your own server for weak ciphers (from another machine)
ssh-audit server.example.com
💡 Interview tip: A complete answer to “how do you harden SSH?” covers four layers: authentication (keys only, no root, no empty passwords), access control (AllowUsers, firewall rules), session hygiene (timeouts, MaxAuthTries), and cryptography (modern ciphers and MACs only). Mentioning
fail2banandssh-auditas operational tools shows the interviewer you think beyond just config files.
💪 PRACTICE