Chapter 4: Storage
Interview Questions
This chapter answers to the following questions:
What is LVM and What Are Its Use Cases?
LVM (Logical Volume Manager) is a storage abstraction layer in Linux that sits between raw physical disks and the filesystems that use them. Instead of partitioning a disk directly and formatting it, you pool one or more physical disks (or partitions) under LVM’s control and carve out logical volumes from that pool. The filesystem has no idea how many physical disks are underneath — it just sees a block device of the size you asked for.
LVM introduces three layers of abstraction:
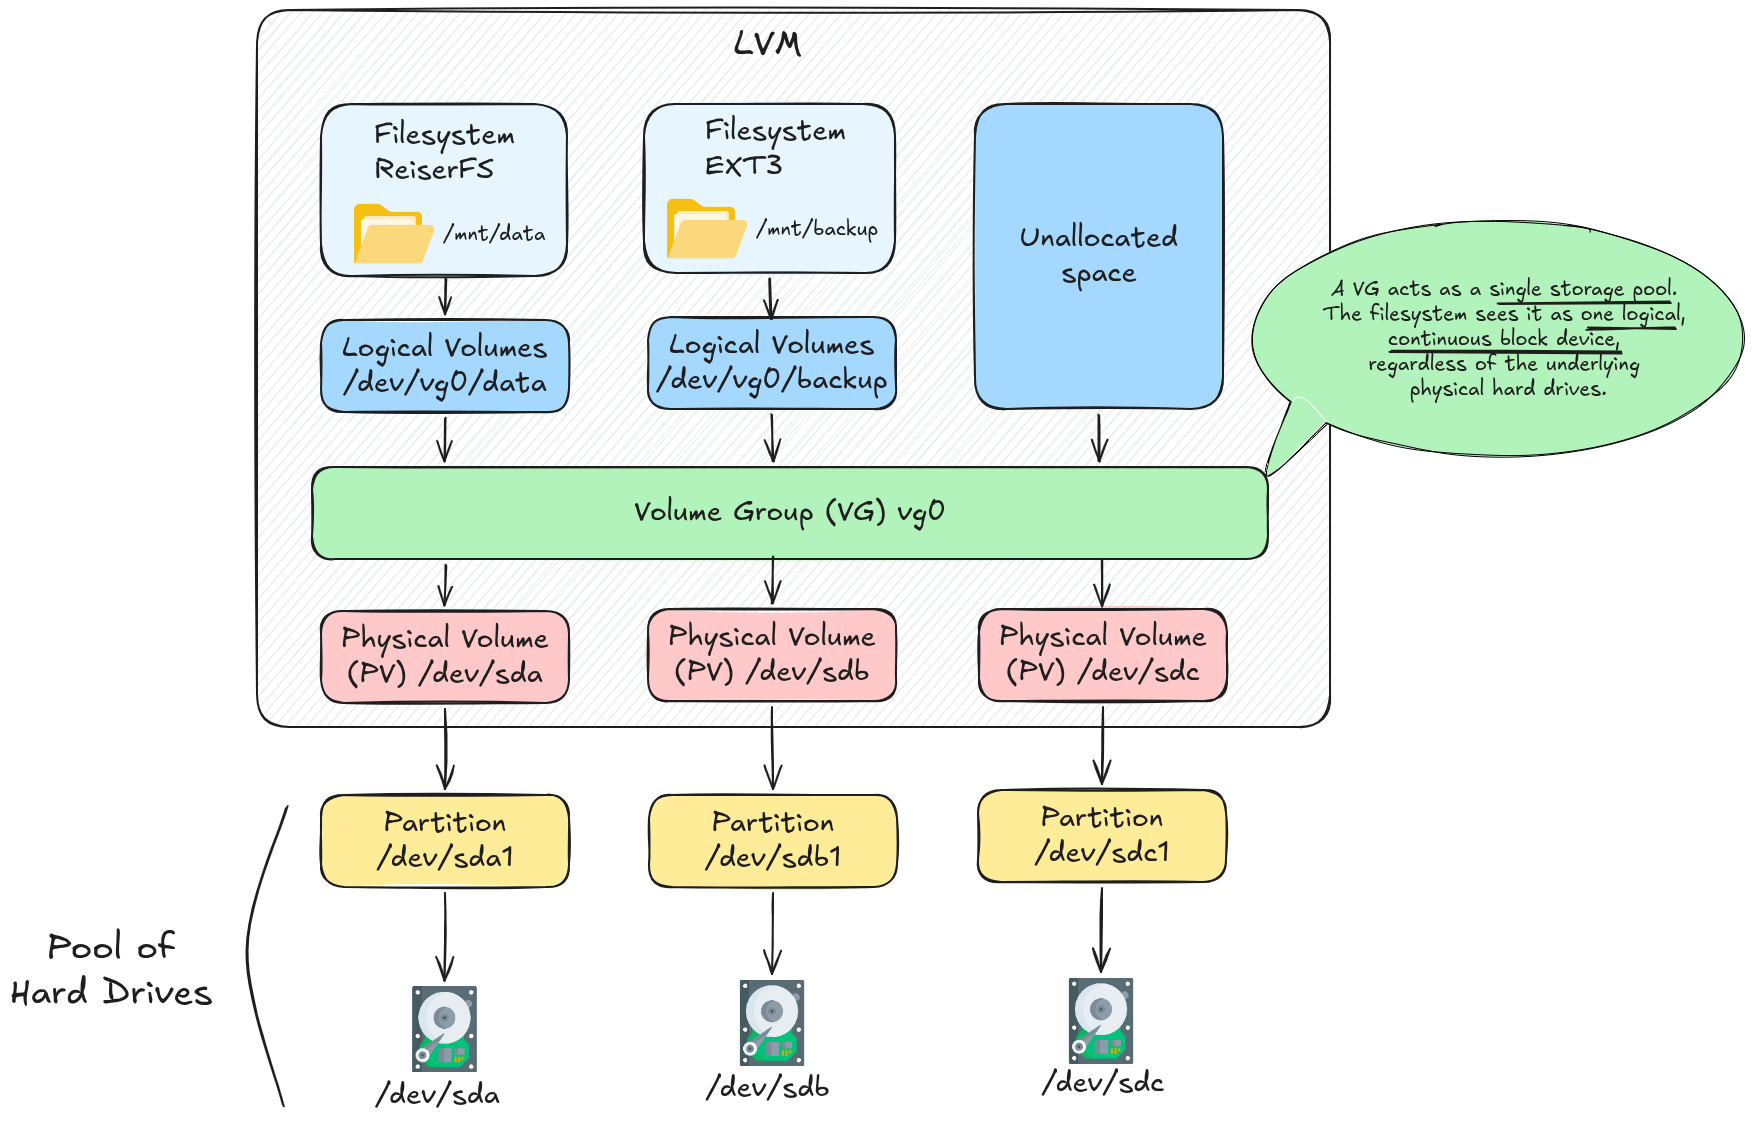
The Three Layers
Physical Volume (PV)
A Physical Volume is a raw disk or partition that has been initialised for LVM use. LVM writes a small metadata header to it and divides the rest into fixed-size chunks called Physical Extents (PEs) (default 4 MiB each).
pvcreate /dev/sdb              # initialise a disk as a PV
pvcreate /dev/sdc1             # or a partition
pvs                            # list PVs
pvdisplay /dev/sdb             # detailed info
Volume Group (VG)
A Volume Group aggregates one or more PVs into a single storage pool. All PEs from every member PV are available to the group. The VG is the unit of administration — you add capacity by adding a new PV to the VG.
vgcreate vg0 /dev/sdb /dev/sdc   # create VG from two PVs
vgextend vg0 /dev/sdd            # add a third disk later
vgs                              # list VGs
vgdisplay vg0                    # detailed info
Logical Volume (LV)
A Logical Volume is a virtual block device allocated from the VG’s pool of extents. It appears as /dev/vg0/lvname (or /dev/mapper/vg0-lvname), can be formatted with any filesystem, and mounted like any other block device.
lvcreate -L 50G -n data vg0      # create a 50 GiB LV named "data"
lvcreate -l 100%FREE -n backup vg0  # use all remaining space
lvs                              # list LVs
lvdisplay /dev/vg0/data          # detailed info

mkfs.ext4 /dev/vg0/data          # format
mount /dev/vg0/data /mnt/data    # mount
Key Concepts
Linear vs Striped Layouts
By default, LVM writes data linearly: it fills one PV before moving on to the next. You can alternatively create a striped LV that distributes writes across multiple PVs simultaneously, improving throughput at the cost of availability (like RAID 0):
# Striped LV across 3 PVs, 256 KiB stripe size
lvcreate -L 100G -n fastdata -i 3 -I 256 vg0
Use Cases
1. Resize Filesystems Without Downtime
The most common reason to use LVM. With raw partitions, running out of space on /var means repartitioning, which usually requires a reboot and risks data loss. With LVM, you extend a Logical Volume and grow the filesystem in seconds — often while the volume is mounted.
Extend a Logical Volume and its filesystem:
# Step 1: extend the LV by 20 GiB
lvextend -L +20G /dev/vg0/data

# Step 2: grow the filesystem to fill the new space
resize2fs /dev/vg0/data          # ext4
xfs_growfs /mnt/data             # xfs (must be mounted)
Or do both in one command:
lvextend -L +20G --resizefs /dev/vg0/data
Shrink (ext4 only; XFS cannot shrink):
umount /mnt/data
e2fsck -f /dev/vg0/data          # check filesystem first
resize2fs /dev/vg0/data 30G      # shrink filesystem to 30 GiB
lvreduce -L 30G /dev/vg0/data    # shrink LV to match
mount /dev/vg0/data /mnt/data
Always shrink the filesystem first, then the LV. Always grow the LV first, then the filesystem. Reversing the order truncates data.
2. Add Disk Capacity on the Fly
When a server runs low on disk space, you can plug in a new disk and add it to an existing VG — no rebooting, no reformatting, no downtime:
pvcreate /dev/sdd                # prepare new disk
vgextend vg0 /dev/sdd            # add to the pool
lvextend -L +100G --resizefs /dev/vg0/data  # take some of the new space
3. Snapshots for Consistent Backups
LVM can create a snapshot of a Logical Volume — a point-in-time copy that uses copy-on-write (CoW). Only blocks that change after the snapshot is taken are duplicated; unchanged blocks are shared. This means a snapshot of a 100 GiB volume is nearly instant and consumes almost no space initially.
# Create a 5 GiB snapshot of /dev/vg0/data
lvcreate -L 5G -s -n data_snap /dev/vg0/data

# Mount it read-only and back it up
mount -o ro /dev/vg0/data_snap /mnt/snap
rsync -av /mnt/snap/ /backup/data/

# Unmount and remove the snapshot when done
umount /mnt/snap
lvremove /dev/vg0/data_snap
The original volume continues serving live traffic during the backup. If the snapshot fills its allocated space before you remove it, it becomes invalid — size the snapshot generously or use lvextend to grow it if needed.
4. Migrate Data Between Physical Disks
pvmove relocates Physical Extents from one PV to another while the Logical Volume remains mounted. This lets you replace a failing disk or retire old hardware without any downtime:
# Move all data off /dev/sdb to remaining PVs in the VG
pvmove /dev/sdb

# Or move a specific LV's data only
pvmove -n /dev/vg0/data /dev/sdb /dev/sdc

# Once pvmove completes, remove the PV from the VG and decommission it
vgreduce vg0 /dev/sdb
pvremove /dev/sdb
5. Thin Provisioning
Thin provisioning is a storage management technique that allocates physical disk space to applications or virtual machines dynamically as data is written, rather than reserving the entire requested capacity upfront. This approach optimizes storage utilization, reduces hardware costs, and allows administrators to allocate more virtual storage than physically exists.
# Create a thin pool of 200 GiB from the VG
lvcreate -L 200G --thinpool mypool vg0

# Create thin LVs totalling 500 GiB from the 200 GiB pool
lvcreate -V 100G --thin -n vm1 vg0/mypool
lvcreate -V 100G --thin -n vm2 vg0/mypool
lvcreate -V 100G --thin -n vm3 vg0/mypool
lvcreate -V 100G --thin -n vm4 vg0/mypool
lvcreate -V 100G --thin -n vm5 vg0/mypool
Common in VM host environments where VMs are provisioned with generous disk quotas but rarely use their full allocation.
LVM vs Direct Partitioning
| Feature | Raw Partitions | LVM |
|---|---|---|
| Resize without reboot | No | Yes (grow always; shrink ext4) |
| Span multiple disks | No (RAID aside) | Yes, transparently |
| Add disk capacity live | No | Yes (vgextend) |
| Point-in-time snapshots | No | Yes (lvcreate -s) |
| Migrate data between disks | Requires rsync + downtime | Yes (pvmove) |
| Thin provisioning | No | Yes (thin pools) |
| Complexity | Low | Medium |
Boot partition (/boot) | Fine | Avoid — most bootloaders don’t support LVM |
/bootis typically kept on a plain partition outside LVM because GRUB must read it before the LVM tools are loaded by the initramfs.
Useful Diagnostic Commands
pvs                            # summary of all PVs
vgs                            # summary of all VGs
lvs                            # summary of all LVs

pvdisplay                      # verbose PV info including PE layout
vgdisplay                      # verbose VG info
lvdisplay                      # verbose LV info

lsblk                          # block device tree — shows PV/VG/LV relationships
dmsetup ls --tree              # device-mapper tree (what LVM uses underneath)

vgck vg0                       # check VG metadata consistency
💡 Interview tip: A common interview question is “how would you recover space when a partition is full in production?” The LVM answer is: add a new disk with
pvcreate+vgextend, then grow the LV withlvextend --resizefs— all without unmounting or rebooting. Contrast this with the raw-partition answer, which involves repartitioning or moving data, both of which require downtime.
💡 PRACTICE
⬆️ Advanced: LVM: Extending Disk Space for a Database Server